Showing posts with label Quilts. Show all posts

Thursday, June 23, 2016

New 90" Fabric


>New 90” Fabric<


We have new 90” wide fabric! These fabrics are so great for easy tying quilts! If you’re looking for simple projects be sure to stop in and check out these fun new prints!  

Tuesday, June 21, 2016

Row by Row

For more  instructions and a list of participating shops use this link.
https://www.rowbyrowexperience.com/

Prizes and collectibles!

Create a quilt using at least 8 different 2016 rows from 8 different 2016 participating RxR shops and be the first to bring it into a participating shop to win a stack of 25 fat quarters (6-1/4 yards of fabric!). Use that shop’s row in your quilt and win a bonus prize! Click here for more details.
Our Row by Row kits are just $7.00 each and include a 20% Off Discount Coupon for a future fabric purchase.

The Fabric Mill will also be holding a drawing for a $50 Gift Certificate for those who use our pattern and who buy a kit or fabric for their project.   They can either show us the completed quilt or email us a photo.


You have from June 21st though September 8th to pick up your pattern and kit.
Quilts must be completed by Oct 31st.


Friday, October 9, 2015

Urban Abacus

Urban Abacus quilt

This fun new display quilt was made using the “Urban Abacus” pattern from the very talented Sew Kind of Wonderful. 

It uses the Quick Curve Ruler which is a fun tool to use! 

Urban Abacus pattern

Have you used the Quick Curve Ruler yet?  We did a table runner tutorial here on our blog to show just how fun and easy the ruler is to use. 


Wednesday, October 7, 2015

Simply Colorful

Simply Color precuts

We’ve been loving the red, orange and yellow Simply Colorful fabrics for the last little while, and now they’ve been joined by the blue, green and purples! 

Simply Color precuts 2

We have the Junior Jelly Rolls and layer cakes ready for you to grab and go!

And check out these fun projects from the Moda Bake Shop using Simply Colorful fabrics -- (click on the image to be taken to the FREE tutorial)
MBS-SunsetRidge_Title

Ombre


Friday, August 28, 2015

All In A Row

All in a row quilt

Looking for a great way to use a favorite Jelly Roll?  This “All In A Row” quilt pattern is the solution!

All In A Row quilt pattern

Our display quilt was made using these vibrant “On The Wing” jelly rolls.  I love those rich blues!

On The Wing precuts[2]


Monday, August 10, 2015

Follow Me fabrics

Follow Me fabrics from Henry Glass

We love these new fabrics from Henry Glass called Follow Me! 

Follow Me panel 

These images are from the panel – the one panel comes with instructions to make a cute book -

Follow Me panel 2 

But we decided to take the same panel and make a children’s quilt! 

Follow Me Quilt 2

And we have kits for this quilt available as well! 


Saturday, August 8, 2015

Tick Tock quilt kits

Tick Tock display quilt

This fun quilt is called “Tick Tock” and is now available as a kit for a limited time! 

Tick Tock quilt kits 2 

The Tick Tock pattern comes from this fabulous book:

Growing Up Modern quilt book

The kit costs $54 and the finished quilt measures about 58” x 71” which is between a crib and twin size.  You'll need the book as well, if you don't already own it!  But it's a great one and filled with so many fun patterns.

Tick Tock quilt kits


Monday, August 3, 2015

Simply Colorful!

Simply Colorful 1 

Simply Colorful (by V and Co for Moda) has hit the shelves!  We have charm packs and jelly rolls…

Simply Colorful jelly rolls  

as well as the lovely reds and pinks in yardage.

Simply Colorful yardage

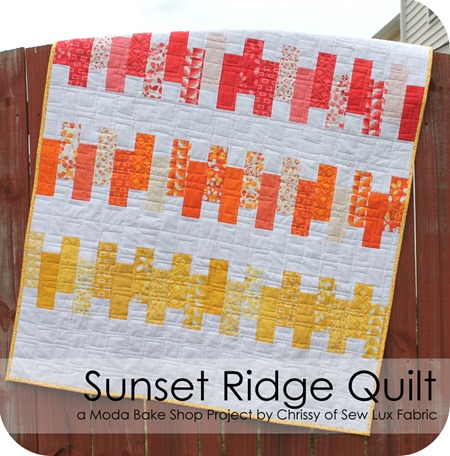
And here’s some inspiration for you!  This quilt is a free tutorial over on the Moda Bake Shop blog.  It’s called Sunset Ridge and it uses the junior jelly rolls  that we have in the shop.  So cute!

Sunset Ridge quilt


Thursday, July 2, 2015

Minions are Here!

Minions fabric 1

The Minions prints have arrived!  We have a total of 17 prints, including panels and coordinating prints. 

Minions fabric 3 

I love the basics in the stack below – those stripes are fun!

Minions fabric 2 

And how about some orange:

Minions fabric 4 

And this is one of the two panels we have in the shop -

1 in a minion panel

He’s a cutie.  And with all of the fun coordinating prints, this panel makes it fast and easy to whip up a quilt!

And right now Quilting Treasures has a free downloadable quilt pattern here on their site.  Print the pattern and bring it with you to the shop to pick up the fabrics you’ll need!  The center of the quilt is cut from the other panel we have available.

Minion quilt pattern


Wednesday, July 1, 2015

Row by Row H2O

Row by Row experience 1

Have you been in to see our pattern for the Row by Row Experience?  We designed these cute little pieced goldfish for our row pattern.  You can stop between now and September 8th to pick up a free pattern (we also have kits!)   

Row by Row fishies

You can read more about the RxR Experience here, and here!


Tuesday, June 23, 2015

Row by Row Experience!

 Row by Row experience 1


Hi friends!  The Row by Row Experience has started!  What is the Row by Row Experience you ask?  Well,  it’s a little like a shop hop, but it’s not!  It’s a nation-wide event, where you can visit your favorite quilt shops and collect patterns for one row of a quilt.  Then create the rows and join them however you want to make your very unique RxR Experience quilt! 

You can read more about the RxR Experience here, and the FAQ are here. 

We have a Utah RxR Experience Facebook page, where you can see some of the rows of the participating Utah shops. 

And there’s prizes too!  Create a quilt using at least 8 different 2015 rows from 8 different participating RxR shops and be the FIRST to bring it in to The Fabric Mill to win a stack of 25 fat quarters – that’s 6-1/4 yards of fabric!

This year’s theme is “H2O” and it’s been fun to see some of the rows from around the country already!  Find shops from around the country here.  To find all of the participating Utah shops click here.  You can see the shops in list form or map form – so handy!

I won’t give it away yet, but here’s just a sneak peek of the Fabric Mill’s pattern for this year’s RxR.  I spy bubbles!

Row by Row sneak peek

You can see the full row in the shop – we have a sample all quilted up and the patterns are hot off the presses and ready to go!  See you soon!


Friday, June 5, 2015

Parisian

Have you stopped by on your way through the shop hop yet?  We have a free mini quilt pattern, drawings, treats and giveaways!  The shop hop runs through Saturday night so there’s still time! 

If you're new to the blog - welcome!  Be sure to enter your email in the box to the right to be added to our email list.  That way, you'll receive each new blog post as an email within 24 hours so you won't miss a thing!  You can also follow us on facebook to keep informed on new fabrics, sales and other fun fabric happenings.

parisian fabric

Parisian is one of our newest fabric lines in stock.  We have precuts (5” stackers, and 10” stackers) as well as yardage.  I just love this yellow, gray and black color combo! 

Parisian free quilt

This cute quilt is a free downloadable pattern from Riley Blake using the new Parisian line.  Click here to view and print the pattern and then stop by the shop to grab the fabrics you’ll need. 


Wednesday, May 20, 2015

‘Tis the Season to be Patriotic!

Can you believe that Memorial Day weekend is already here?  We are getting the shop ready for those Summer projects that you have in mind – and our red white and blue fabrics are all gathered together on the front shelves!

Land of the free display quilt

We also have a new display quilt and kit!  You can start this one this weekend and have it finished and ready by July!

Land of the free display quilt kit 

The kit is $76.50 and is available to order over the phone (801-225-3123) or stop by the shop and pick one up!

We also have a bolt of these great Riley Blake holiday banners.  These are a quick project and a fast way to add a festive touch to your home or party.

Holiday banners

Riley Blake has created a Holiday Banner pattern sheet for you to download and print.  It gives the instructions and ideas to embellish your banner!  Click here to view the pattern sheet.

And don’t forget – the Shop Hop is coming up next week!  NO passport is needed – just hop from shop to shop and have a fun time.  Click here for more info!

Wednesday, May 6, 2015

Aloha Girl + new display quilt

This fabulous quilt is one of our new displays and it is made with Aloha Girl fabrics – the newest line from Fig Tree Quilts (Moda)

Aloha Girl quilt 2

The pattern is called "Bouquet of Patchwork" by Carlene Westberg Designs.  The quilt measures 62"x 62" and all you need is one layer cake and one charm pack! 


And we have plenty of Aloha Girl precuts – jelly rolls, charm packs, layer cakes!

Aloha Girl precuts

Aloha Girl is such a pretty line!

Aloha Girl fabric

And speaking of Fig Tree, did you see our custom jelly rolls?  We’ve combined our favorite Fig Tree prints from three different lines to make these custom jelly rolls that you can’t find anywhere else!  These are available for just a limited time.

Fig Tree custom jelly rolls


Thursday, April 30, 2015

Ambleside

Ambleside precuts 

We’ve been seeing such lovely projects being made with Ambleside fabrics!  I just wanted to let you know that we have not only yardage, but also charm packs and layer cakes from the very pretty Ambleside line. 

Whirled quilt pattern using Amblesie fabric

And this quilt is one of our most recent displays – made from the Whirled quilt pattern, Ambleside fabrics and one of our softest Minky fabrics on the back!

Monday, March 30, 2015

Fresh Cut + Quilt Display

We’ve had such in influx of great new fabric, I feel like that’s all I’ve been blogging about!  But I HAVE to show you when pretty things show up on the shelves, right?  Well today I’m giving you a peek at a line called Fresh Cut (Moda)

Fresh Cut fabric from Moda 

And we have Jelly Rolls and Layer Cakes for Fresh Cut too!

Fresh Cut precuts

Today I also have a quilt to show off!  This quilt display is the Running Offset pattern (blogged about first here) but made in Day Sail fabric (Bonnie & Camille for Moda).  Fun, isn’t it?

Running Offset quilt pattern display

The pattern is available only at The Fabric Mill!


Tuesday, March 17, 2015

Curves Made Easy! Quick Curve Ruler Tutorial

Have you heard of the Quick Curve Ruler?  It’s a pretty slick tool that makes cutting, piecing and sewing with curves a breeze!  We carry the Quick Curve Ruler here at The Fabric Mill, and so I thought I’d do a quick walk through to show you just how easy using this ruler is!

Quick Curve Ruler table runner

This table runner pattern (called Urban Runner) is free and included with the ruler – it’s actually the back and the inside of the ruler’s label.  There are also other quilt patterns available that use the ruler (we carry several!).  Oh- and for a limited time, we have kits for this runner too!

Let’s get started!  First of all, we need to cut the curves.   The instructions for this runner do a great job of explaining these steps, including diagrams but I’m a visual learner and step by step photographs are helpful. 

QCR tutorial 1

You’ll need long, 8.5” wide strips of fabric.  For the first curve, line up the top and bottom edges of the fabric with the dashed lines on the ruler.  Then move the cutting slit (where your rotary cutter fits into the ruler) all the way over to the left edge of the fabric.  Use your regular rotary cutter to slice right along that curved slit. 

QCR tutorial 2

Look – you did it!  Next, move the ruler over so that the top and bottom edges of fabric still line up with the dashed line on the ruler.  The curved dashed line on the left will now line up with the curve you just cut.  You’re now ready to cut the next curve -

QCR tutorial 3

Just like this! 

QCR tutorial 4

Now continue moving the ruler over and cutting curves until you get to the end of your fabric strip -

QCR tutorial 5

Repeat these steps for the other fabrics you’ll be using.  For this table runner kit, there are four main prints. 

QCR tutorial 9

That wasn’t so bad, was it?  Next we’ll cut the background (white) pieces.
These 3.5" x 8.5" background pieces can be stacked and cut two or three at a time.  Line up the top and bottom edge of the fabric along the same dashed line like we did with the main prints.  The right edge of the fabric will line up with the right edge of the ruler.  Now just cut along the curved slit.

QCR tutorial 6 

Voila!  Really, once you get the hang of this, it goes pretty quickly.

QCR tutorial 7

Repeat until you have cut all of the background curves.

QCR tutorial 8

Now we are ready to sew!  At this point I highly recommend you cut two test blocks out and sew them first.  After two blocks you’ll get the feel of it and your blocks will improve.

Grab one main fabric piece and one small background piece (concave curve).  Line them up, right sides together, with 1/4” bit of the background fabric peeking out at the top.

QCR tutorial 10

Place fabrics under the presser foot and using a 1/4” seam…

QCR tutorial 11


…start sewing.  It helped me to lift the top fabric up as I sewed.  Keep the right edge of the fabrics lined up at the 1/4” seam as you sew.  Go nice and slow at first – and you’ll get the hang of it – I promise!

QCR tutorial 12

When you get to the end, the bottom the white fabric should peek out about 1/4” again like when you started.  We will trim these blocks down a bit when we square them up later so if they’re not perfect that’s okay!

QCR tutorial 13

Open up your block and pat yourself on the back because you just sewed a curve! 

QCR tutorial 14

We need to add the other side of the block now.  Grab the second piece of background fabric and line it up as shown below:

QCR tutorial 15

Sew as you did before, with a 1/4” seam, and lifting the top layer up a bit as you sew.

QCR tutorial 16

Repeat until you have made all 28 of these.

QCR tutorial 17

Press the blocks and then we will trim and square them up.

Place the ruler with the top and bottom edge of the curve lining up at about the 1/4” mark on the ruler (see red circles).  The top and bottom left edges of the curve should line up at about the 2-1/4” mark on the ruler.  Trim the top and right edge of the block.

QCR tutorial 18

Rotate the block so we can trim the other two edges.  This time just line up the left edge with the 4” line on the ruler, and the bottom edge with the 8” line on the ruler.  Trim off the top and right side of the block.

QCR tutorial 19

Repeat to trim and square all blocks – don’t they look great? 

QCR tutorial 21

You’re now ready to sew the blocks together -

QCR tutorial 22

You will need 14 of these for the runner.

Quick Curve Ruler table runner 3jpg

This was my first time trying the Quick Curve Ruler and I’m glad I tackled this smaller project first.  I feel like I’ve got the hang of it though and I’m ready to tackle a whole quilt pattern!

If you’re needing a little more encouragement, the designers of the ruler have three online video tutorials to show you how to cut curves, sew curves, and square up blocks.  You can find the videos here.

The kits for this runner are $15.50 and available while supplies last!