Friday, June 28, 2013

Kensington


kensington by Riley Blake

Kensington (Riley Blake) is now on the shelves!  I can’t get enough of these corals –deeelicious!

kensington corals


Tuesday, June 25, 2013

Red Riding Tote–tutorial

I am loving the Little Red Riding Hood fabrics from Riley Blake.  This "little border" print was just begging to be made into a tote bag!  The bag finishes at 9" x 9" x 3" which is the perfect size for your favorite 3-7 year old young lady:

Little Red Riding Hood tote bag tutorial

and is just right for carrying a few favorite books and a beloved friend on a trip to Grandma's house:

Little Red Riding Hood tote bag tutorial


Red Riding Tote tutorial
by
Andy Knowlton


Red Riding Tote tutorial from the Fabric Mill


Materials Needed:

3/4 yard of Little Red Riding Hood “Little Border” print (Riley Blake)**
1/8 yard of one coordinating print (this is optional)
two (11” x 13”) pieces of fusible fleece

**this is the “little border” print.  The print is currently available in both red and pink at the Fabric Mill.**
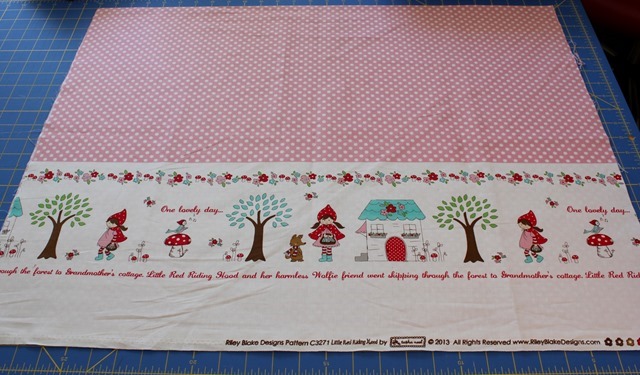
red riding hood little border pink

Step 1:  Take the 3/4 yard of “Little Border” print and unfold it.  Line up your ruler so that the 1/2” marking line lies directly under the line of words (see photo.)   Trim along that edge.

tote 1

tote 2


Step 2:  Following the cutting diagram, cut all of the following pieces

2@ 13” x 19” (with the border along the 13” edge)
2@ 4” x 18” for handles
2 @ 3.5” x 13” for bag bottom (option: this can be cut from a coordinating fabric instead)

cutting layout


Step 3:  Using a 1/4” seam, sew the two 3.5” x 13” bag bottom strips to the bottom edge of each of the 13” x 19” main bag pieces.  (I used a coordinating fabric for the bag bottom.)  Press seam.

Tote Bag tutorial


Step 4:  Fuse the 11” x 13” piece of fusible fleece to the wrong side of each of the main bag pieces.  The fusible fleece needs to be on the bottom half of the bag.

 Tote Bag tutorial


Step 5:  Place main bag pieces right sides together. 

tote 6

Be sure that these lines (printed on the fabric) match up. 

tote 7

Pin around the bag along the edges.  Along the top edge we will be leaving about 5” open (unsewn).  I like to mark those spots with double pins to remind me not to stitch there.

Tote Bag tutorial

Using a 1/4” seam, Sew around edge of bag, pivoting at corners and leaving about 5” open for turning.


Step 6:  To create the flat bottom on this bag, on one corner match seam line to seam line and mark 1.5” down from the point.  Sew along the marked line (which should measure about 3” long). 

Tote Bag tutorial

Repeat for all four corners:

Tote Bag tutorial

Then trim each corner about 1/4” from stitching:

Tote Bag tutorial

Step 7:  Turn bag right side out and push out each corner:

Tote Bag tutorial

Step 8:  Sew the 5” opening closed by pressing first and then carefully sewing along the edge.

Tote Bag tutorial

Step 9:  Push bag lining into bag, press along top edge of bag and then stop to admire your handiwork thus far!
Red Riding Hood tote bag tutorial


Red Riding Hood tote bag tutorial

Step 10:  Now for the handles!  Press up 1/2” on each end of both handles:

Red Riding Hood tote bag tutorial

Fold (and press) in half lengthwise.  Then unfold and press the outside edges in to the center. 

Red Riding Hood tote bag tutorial

Then fold again on center line and press:

Red Riding Hood tote bag tutorial

Step 11:  Sew along each edge of the handles a scant 1/8 from the edge:

Red Riding Hood tote bag tutorial

Then sew down the center of each handle:

Red Riding Hood tote bag tutorial

Step 12:  Pin the ends of the handles to the inside of the tote bag, 2.5” from the side seam. 

Red Riding Hood tote bag tutorial

Stitch handles in place, making sure to use a coordinating thread because this will show on the outside of the tote!

Red Riding Hood tote bag tutorial

Little Red Riding Hood tote bag tutorial

Your lovely tote is complete and ready to be used and loved!


Tuesday, June 18, 2013

Giveaway Winners

I hope you all had fun at the Summer Buzz shop hop last week.  It was fun to see so many of you stop by!  The next shop hop will be coming up this fall and we are already "stirring" up some big ideas!

Here is the list of giveaway winners for here at the Fabric Mill:

$50 gift certificate winners: 
Sue Robinson of Spanish Fork
Barbara Brown of Orem

$25 gift certificate winners:
Kelsie Christensen of Orem
Marilyn Devey of Lindon
Jessica Snow of Orem

Congratulations to each of the winners!

Tuesday, May 21, 2013

One For the Boys + Whirled

One of our most recent lines from Riley Blake is called One For the Boys.  It’s full of stars, chevrons and stripes.  We have it in flannels as well as cottons.  To give you an idea of a great way to use these fabrics, here they are in the Whirled quilt pattern. 


Whirled quilt pattern with One For the Boys fabrics


This Whirled quilt pattern is an exclusive to The Fabric Mill and is only available in the shop.  This is the throw size and measures 64” x 78”.  Crib size and Twin size instructions are also available with the pattern. 

Saturday, May 18, 2013

So Happy Together


I thought today I’d show you one of our newest display quilts.  This is a raw edge squares quilt created by Trisha:

Sew Happy Together raw edge squares quilt from The Fabric Mill


She used fabrics from the So Happy Together line by Riley Blake.  Have you seen these?  They are indeed happy fabrics! 
So Happy Together fabrics at The Fabric Mill

Trisha’s quilt is so sweet.  Stop by the shop and check it out.  While you’re here grab some of the So Happy Together fabrics – they’re not going to last long!

Thursday, May 16, 2013

Quilting Coordinates


We have some great new coordinates in stock – check these out!

Crimp prints from Hipster - found at The Fabric Mill

This stack of fabrics are the “crimp” prints from Riley Blake’s Hipster cottons.  We have all of the available colors in stock.  Here’s an up-close shot of what the crimping looks like:

Crimp prints from Hipster - found at The Fabric Mill

These are great fabrics to use as coordinates with your favorite main prints.

Tuesday, May 14, 2013

Geekly Chic


Mustaches are all the rage and we have them.  Well, in fabric anyway.  These are from the Geekly Chic line from Riley Blake. 

Geekly Chic - mustache fabric found at The Fabric Mill

I love the multi colored on black, but we also have the Geekly Mustaches in Aqua.

Geekly Chic - mustache fabric found at The Fabric Mill

Tuesday, April 30, 2013

Sweet Valentine Quilt Kit


Sweet Valentine Quilt + Kit

This is one of our newer display quilts - it’s called Sweet Valentine and I love the red, black and white color combo.  So striking! 

Sweet Valentine Quilt Kit

The pattern for this quilt can be found in the Buggy Barn book “Gone Crazy” and we also have quilt kits available.  The kit is $45 and the quilt finishes at 49” x 49”.  It is available in the shop or by ordering over the phone:  801-225-3123

Tuesday, April 23, 2013

PB & J


Nope, I’m not talking about lunch.  I’m talking about a new line of fabric from Moda called PB&J.  The fabrics are delicious though!  We have all of the precut options – jelly roll, layer cake, charm pack.

PB&J precuts at The Fabric Mill

We also have the entire line in yardage and also a quilt kit available!  The kit includes the All Lined Up pattern and the fabrics needed for the quilt top and binding.


PB&J quilt kit - perfect jelly roll quilt!

The quilt finishes at 58” x 79”.  The quilt kit is $75.00 and is available in the shop or by ordering over the phone:  801-225-3123.

Monday, April 22, 2013

New Fabrics: Susybee purples and greens


I wanted to show you some of my favorite fabrics in the shop right now:

Lovely purple and green fabrics from Susybee

These are from Susybee fabrics.

I’m in love with these purples and greens.  Of course, it may have something to do with the fact that purple lilacs are my favorite flower and they are just days away from blooming. 

Lovely purple and green fabrics from Susybee

We also have some of these fabrics cut at fat quarters – ready to grab and go!

Lovely purple and green fabrics from Susybee