by Trisha Weekes
Materials
needed:
½ yard of
outside fabric
½ yard of
liner fabric
1 fat
quarter of choice
*optional-2
yards of jumbo ric-rac
Thread
note: please read through all steps before beginning any project
Step one:
Start by
squaring up your fabric, making sure you have 2- 18”x42” rectangles (18”x21”
folded) removing the selvedge edges.
From the fat
quarter cut 2- 4”x22” strips, these are for our handles.
Step two:
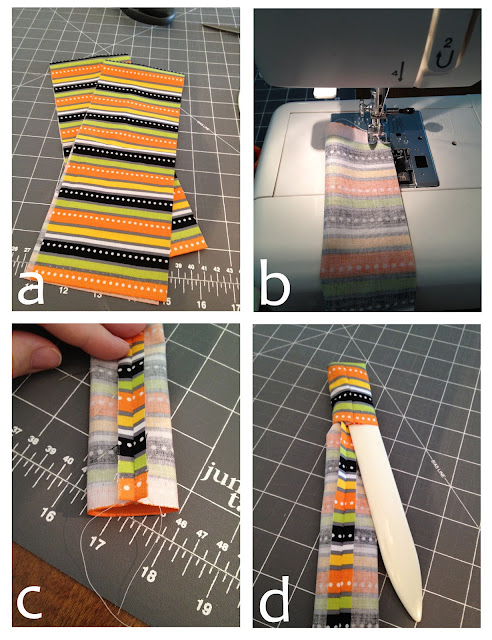
(a) Fold the
4”x22” strips in half lengthwise, right sides together.
(b) Sew a ¼” seam lengthwise down both strips of fabric.
(c) Open and Press seams.
(d) Turn each strip so right sides are out.
(b) Sew a ¼” seam lengthwise down both strips of fabric.
(c) Open and Press seams.
(d) Turn each strip so right sides are out.
Press so the seam is running down the middle, turn over and top stitch ¼” on each side of the handle. Repeat until both handles are complete.
Next stabilize the handles by making X's as shown in the picture.
Step three:
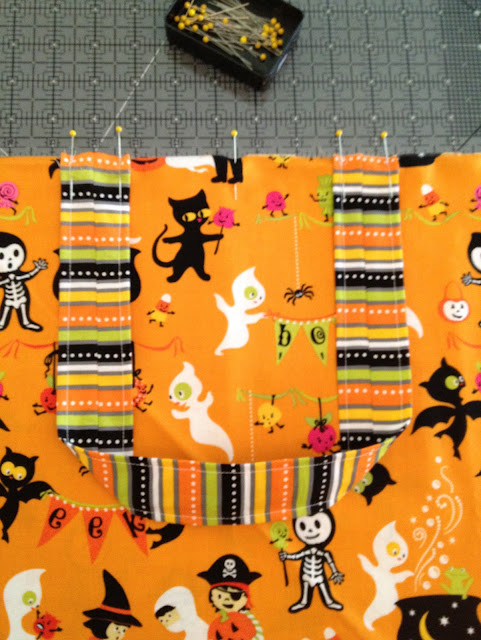
Pin handles
onto the top outside of selected fabric, at 8” in and 14”in from the side. You
want the seam on the handle to be facing the liner fabric. Fold fabric over and
using the first handles as a guide pin the other handle to the other side. Then
place the lining fabric to the outside of fabric (right sides together) and
sandwich the handles between the two fabrics.
Pin, then sew a ¼” seam along the top of both fabrics, back stitching over the handles to secure them between the two fabrics.
Step four:
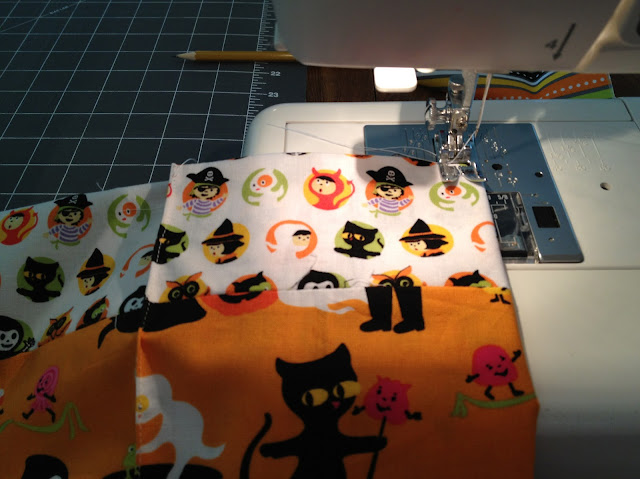
Open and
press this seam, then fold the fabrics in half lengthwise (right sides together
still). Liner fabric facing liner fabric and outside facing outside. Sew a ¼”
seam down the side. Open and press this
seam.
Fold back over the outside fabric (so the right sides out), line up the raw edge of the outside with the bottom of raw edge of the liner fabric (wrong sides together). At this step you have the option to add a heavy interfacing to the bag, we've left it out of our bag. Sew a ¼” seam around the bottom opening, just the two layers not the four total layers. Then zig-zag stitch the raw layers to prevent fraying.
Step five:
Now we're going to create the border at the top of the
bag, by shifting the two fabrics about 2”. By doing this it creates a unique
layer, we get to see the liner fabric at the same time as the outside, but also
creates the bottom of the bags guides and seams.
*Please note: that with my
fabric, the liner fabric as seen from the outside of the bag is going the right
direction, but when looking down into the bag it is upside down. If you have
chosen a directional print you will need to sew your liner fabric upside down
in the previous steps as well*
Step six:
Open up the bottom opening and fold it on the seams, fold in the ends like you would a present, forming a triangle on both ends.
With a ruler and pencil we're going to mark the sides- line up the ruler with the triangle to the top of the bag and make a light line. Do all four sides; after the first two, flip it over refold triangles and draw lines.
Fold and sew an 1/8” seam
down each of the lines drawn.
Step seven:
Fold the bag in
half horizontally, lining up side seams and handles. Turn the bag inside out so
the liner is facing out. We're going to sew up the bottom- line up the fabric
(should be the outside fabric folded over, no raw edges).
Sew a ¼” seam, then zig-zag stitch to reinforce the bottom.
Step eight:
Open up the bottom seams again, with the triangles poking to the
outside of the bag. Along that seam you're going to sew, this will create the
bottom sides of the bag. Repeat on the other side.
Next we'll fold in the triangle and following the seam we'll stay stitch the triangle in place on the bottom of the bag. Repeat on the other side.
Step nine:
Back up to the top of the bag, we're going to top stitch (¼”) around
the top and top stitch the handles down to the bag.
Next stabilize the handles by making X's as shown in the picture.
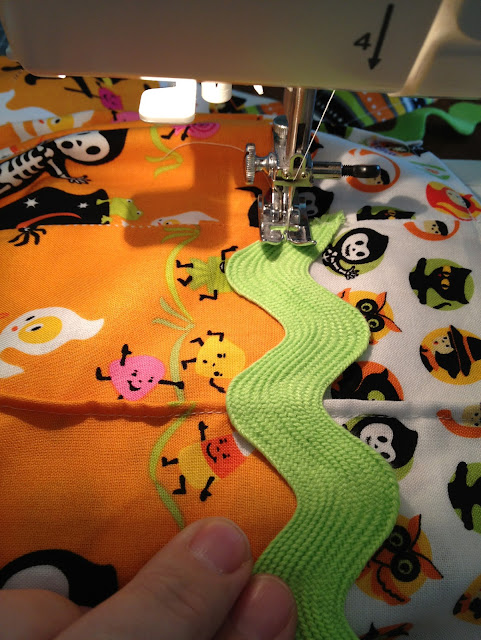
The ric-rac is optional, if you want you can leave it off. To add the ric-rac, line it up with the outside/ liner seam starting at a side, stitch through the middle of the ric-rac securing it to the bag all around the bag.
Step ten:
Give this bag to a kid, who is willing to go door to door and ask for a
trick or a treat! Enjoy a bag full of treats!


Love this tutorial! Have been working on several of these today and will share pics soon. :)
ReplyDeleteThanks Kristy - can't wait to see!
ReplyDeleteVery cute! I will be making these for my two little buglets (grandbabies) this week. Thank you for the tutorial. :0)
ReplyDeleteThanks so much ! I need to make 2 of these for the grandkids !
ReplyDeleteI am on step 6. When I sew the 1/8 in seam, do I sew thru the triangles also or is the material just flat and straight at the bottom? Or is the bottom still folded up on the bottom seam? I think these are darling but just seem to be struggling to get things right. Guess I should say I am far from an expert seamstress!!
ReplyDeleteThese are great treat bags. Thank you so much for the tutorial.
ReplyDeletehttp://www.facebook.com/#!/photo.php?fbid=10151077040790976&set=a.10150256379545976.330249.589490975&type=1&theater
Roxy, sorry, I just saw your comment. The answer is no, you don't sew through the triangles, I just used them as a guide in this step. I hope you didn't get too frustrated or give up! Hope this helped, if you have other questions- please ask!
ReplyDeleteThis comment has been removed by the author.
ReplyDeleteHello My Friend! I Want To Say That This Article Is Amazing, Great Written And Come With Approximately All Important Infos. I Would Like To Look More Posts Like This . Continue Reading
ReplyDeleteUmumnya saya Jangan Baca Artikel Pada Blog, Tapi aku Menginginkan Untuk Katakan Bahwa Ini Sangat Paksa saya Untuk Coba Dan melakukannya! Gaya Menulis Anda Telah Kagum saya. Terima kasih, artikel yang sangat bagus. membaca ini
ReplyDeleteWhere did you purchase the fabric?
ReplyDeleteFrankly, I am disappointed in the bag--I made 2. Directions were confusing and unclear in some steps. Final product, in my opinion, is too large for a smaller child and they are very floppy. The bag needs some interfacing. Based on the representation, I did not use it and it was a huge mistake. Sample bag is very cute but it must be stuff with lots of stuffing.
ReplyDeleteNeeds much better pictures and instructions. Wasted a ton of time and fabric trying to make these, and I am not a novice. Really disappointed.
ReplyDeleteI totally agree with you. I spent all afternoon working on this bag. I have been sewing for 35 years. Mine does not look like the picture.
DeleteTerrible directions. I have been sewing for 35 years and had a hard time getting this bag together. Finally did it my way. Did not look like the picture.
ReplyDeleteThis tutorial is TERRIBLE!!!!!! its a cute bag but the instructions are crappy!! Dont even attempt!
ReplyDeleteI'm stuck on step 4 and would REALLY like to see better instructions...
ReplyDeleteI made this bag for my 6 and 8 year-old kids. I am a novice sewer. I learned a few things along the way that might help someone else.
ReplyDelete1. This is a big bag....appox 16 inches wide by 15 inches tall
2. This bag is floppy.
3. In step 4-place your two piceses right sides together with outside fabric facing outside fabric and lining facing lining and sew down both long sides so you end up with a tube. You will be sewing 2 layers of fabric. Do not sew the bottom. Once you have your tube, turn right side out and fold lining into bag. Your raw edges of the outside fabric and lining will match up with wrong sides together now. Sew around the bottom going through 2 layers of fabric, you will still have a tube. (My son got all excited at this point because it looks like a bag, but I explained that all the candy would fall out...there's no bottom yet)
I was okay after that...I hope it helps someone else!
All in all, its a nice bag and I am glad I didn't give up when the directions had me stumped! I hope you all have a Happy Halloween!
Thank you so much for your input. I finally got it. Your tips help me to understand this. I have everything cut and ready to go I have read this many times. your tips made everything clear. Thank you.
DeleteWhat a waste of an afternoon and material. I have never came across a tutorial like this. Try making a video tutorial and maybe some of us could follow the directions
ReplyDeletehmmmm... if you don't want to "waste" your time or fabric, do as author suggested... READ thru all instructions before beginning project, that way if you do not understand her directions, you can move on and not attempt to make it... thus not wasting time or materials... to author... I thought it was a great tutorial.... thanks for sharing.
DeleteI have finished the first of three bags I plan to make, and I'm working on the second right now. I've got to be honest-- some of these comments are unnecessarily harsh. Yes, the instructions had me stumped at first, and yes, this tutorial could have been more clearly written with more useful photos. I, however, am a stubborn woman and I already had all my fabric cut and ready to go, so no way in the world was I just going to throw my hands up in defeat. I used my common sense and figured it out. No need to bash the woman who so kindly shared her idea FOR FREE. No one is perfect. I am not a novice sewer, but I'm not an expert either. My three little girls are so excited to watch as their trick-or-treat bags come together! This is neither a waste of time nor material. I
ReplyDeleteI completely agree. I made 5 of these bags and they turned out fantastic. I was stumped exactly where you indicated but thought through it and it worked out. I am an intermediate sewer so I don't see how an experienced sewer could get so frustrated and irate about FREE instructions. Thanks for your comment and clarification. Also instead of having a long bag I made it wider by turning the fabric. Easier for little ones to carry!
DeleteThis is a lovely bag but the instructions are very confusing. I am a novice sewer, so perhaps it is my lack of understanding. That said, it is a FREE tutorial and I very much appreciate that it was given to all to enjoy. Maybe a video tutorial, rather than photos, might be easier to follow.
ReplyDeleteWow I have never seen so many rude people in one place-if you read through instructions before cutting, sewing, etc. & don't "get it" move on! Seriously, constructive criticism is always welcome so the person does a better job the next time. If you want to be rude go buy a pattern. This person was generous enough to share what they had made!!
ReplyDeleteJust finished making six very cute bags. Each one was different. I have made made many trick or treat bags over the years for my children (eleven) and now for the grandchildren (14). These were by far the cutest I've made. I want to thank Trisha Weekes for share this pattern. I did make mine smaller 15x30 left handles 4x22.
ReplyDeleteCould you possibly help me. I guess I don't understand the step three I end up with a long tube at step 4 that I can't turn right side out so obviously I'm doing something wrong at step three. Don't know what it is. I sewed the straps on both Ends of the top fabric sandwiched between the top fabric & inner fabric both ends are now sewn together. I'm totally confused.
DeleteThank you so much for your awesome post and tutorial! haberdashery
ReplyDeleteFor people who claim to be an expert at sewing or having been sewing for 10, 15, 35 years, you are awfully negative about these instructions. Gee! If you have been sewing for so long then you really wouldn't need detailed instructions for a simple bag. Thank you to the woman who shared this tutorial on their site for FREE! I look forward to making one for Halloween this year.
ReplyDeleteThis comment has been removed by the author.
ReplyDeleteLove this bag. I'm having a hard to e understanding the placement for the handles. Do I place the first handle 8 in from the left side & the second handle 14 in ? They don't seem to be centered this way. What am I not u understanding?
ReplyDeleteI am also stuck on step 4, so I guess I did something wrong in step 3. I ma giving up & trying something different.
ReplyDeleteI wish someone could please answer the question about handle placement. Ahhhhh
ReplyDeleteIf you look at the picture of the handles, they are 5 inches apart. I would find the middle and go 2 and 1/2 from the middle both ways and place the handles there.
DeleteThanks for Posting!
ReplyDeletePhone number for Avast Antivirus
McAfee Support Phone Number
Norton Antivirus Phone Number
AVG contact number
webroot customer service Phone number
kaspersky customer service Phone number
bitdefender support phone number
Malwarebytes Customer Support
leur explication réplique gucci supplémentaire lecture Dolabuy Fendi consultez ici Dolabuy Louis Vuitton
ReplyDeleteDoes anyone know the finished dimensions of this bag? I made 2 several years ago and I can't remember if I made the second one smaller because the original was too big for my purpose or if I made it bigger as the original was too small.
ReplyDeleteI need to make 2 more for my other two kids!
Thanks!
For people that feel that the bag needs a little more structure, try cutting a piece of plastic canvas or heavy cardboard the size of the bottom. Lay it
ReplyDelete
ReplyDeleteIt’s perfect time to make a few plans for the future and it is time to be happy.
ReplyDeleteI’ve read this post and if I may I want to suggest you some attention-grabbing things or suggestions.
ReplyDeletePerhaps you could write next articles referring to this article.
ReplyDeleteI wish to learn even more things approximately it! Feel free to visit my website;
ReplyDeleteAw, this was an extremely nice post. Taking a few minutes and actual effort to generate a top
notch article.
ReplyDeleteI like what you guys are up also. Such clever work and reporting!
Wow, superb blog layout! Magnificent, let alone the content
ReplyDelete
ReplyDeletePretty! This has been an incredibly wonderful article.
Good blog and absolutely exceptional.
ReplyDelete
ReplyDeleteYou should write more articles like this, you really helped me and I love the subject
ReplyDeleteUsually I don't read post on blogs, however I wish to say that this write-up very impressived!!
ReplyDeleteReally a great addition. I have read this marvelous post
supreme hoodie
ReplyDeleteoff white jordan
supreme new york
jordan 1
curry shoes
kyrie 5 spongebob
bapesta
jordans shoes
goyard
air jordan
If you're searching for robust packaging in North India, consider a reliable PP poly bag manufacturers in Delhi. These bags are crafted from high-grade polypropylene material, ensuring durability and moisture resistance. Perfect for packaging grains, fertilizers, or industrial products, they are available in multiple sizes and colors. With in-house printing facilities, these manufacturers also offer branding solutions. Explore top manufacturers offering quality and bulk supply across Delhi NCR.
ReplyDelete