Thursday, August 30, 2012

Zigging and Zagging


This cute quilt can be made using a free pattern (from Riley Blake) and the "Don't Be Afraid" line of fabric from Northcott.  I'm in love with the fun, vibrant colors from this line as well as the adorable (and not-so-scary) monsters in the border print.  There is also an orange dot print that you can swap out for the red and a mulit-colored dot you could swap for the stars if you choose.   

Here is a link to the free online pattern and below I've listed the fabric requirements for this "Don't Be Afraid" version.  We have all of these fabrics available in the shop and we'll be happy to help you choose a coordinating binding and backing


Zig Zag quilt pattern


Fabric Requirements:
Blue dots (2865-42):  1/2 yard
Light blue dots (2865-60):  1/2 yard
Aqua dots (2865-61):  1/2 yard
Red dots (2865-24):  1/2 yard
Green dots (2865-71):  1/2 yard
Stars on white (2861-10):  1 yard
Green check for inner border (2857-71):  1/2 yard
Monster Print for outer border (2860-61):  1-1/8 yard
Binding of your choice:  5/8 yard


This panel from the same line would be great on the backing or used to make a matching pillow case!
Don't Be Afraid fabric


Monday, August 27, 2012

Spiderweb Table Topper Tutorial


Time for another tutorial to help you get your house ready for Halloween!  This is a delightful Spiderweb Table Topper that is easier to create than you may think.  


This project's finished measurements are 30" from one edge to the parallel edge, and 34" from one point to the opposite point.

Supplies Needed:

1/6 yard each of 6 different fabrics
1 yard backing
1/4 yard binding
Also needed:  a long ruler that has a 60-degree marking on it

Steps:

1.  From each of the 6 fabrics, cut two strips that are 3" x width of fabric. Sort the 12 strips into two groups of 6 so that there is one of each fabric in each grouping.

2.  Next, sew each set of 6 strips together using a 1/4" seam.  The recommended method is to sew two strips together, then press the seam open.  Sew the next two together and press that seam open.  Then sew the last two strips and press open.  Now sew the three sets together, again pressing the seams open.  This method helps prevent warping of the final strip set.  

Each set of strips should measure 15.5" x width of fabric (42" - 44")


Halloween Fabric

3.  Find the 60 degree marking on your ruler:  (I highlighted the 60-degree lines on my ruler so you could see them a bit better.)

60 degree ruler

4.  Line up one of the 60-degree lines with the bottom edge of your fabric strips.  Make sure the top right edge of your ruler crosses just inside of the edge of the top strip (see photo below)  Carefully cut fabric.


60 degree ruler

5.  Keeping fabric strips in place, flip ruler over and find the 60-degree line going in the other direction.  Line up that line again with the bottom edge of the fabric strips. The bottom right side of the ruler should be 1/4" to the left of the point where you started your last cut (see red circle in photo below.)   

Carefully cut fabric.  To check your 60-degree triangles, use the measurements in the photo below (18" at the widest edge and 15.5" tall through the triangle center.  It's okay if this is a little off.)

Spiderweb Table Topper Tutorial

For the next triangle flip your ruler again and move it over (keeping the bottom edge of the strips lined up with that 60-degree mark) so that the top right edge of the ruler is about 1/4" to the left of where your last cut ended.  Triangle #2 is a mirror image so to speak of triangles 1 and 3.  See the diagram below:


6.  From each set of strips you will get three triangles.  Cut all 6 triangles and arrange as desired:

Spiderweb Table Topper

7.  You will be sewing these triangles together into two sets of three.  (Three triangles to form the top half and three triangles to form the bottom half.)  As you sew triangles together, match up the seams and pin at each match-up point (see photo below.)  Press seams open.

Spiderweb Table Topper Tutorial


8.  Once you have the top and bottom halves sewn and pressed, place the two halves right-sides-together (matching up seams as you did above) and sew using a 1/4" seam.  Press.


Your spiderweb top is complete!  Layer with the backing and the batting and then quilt however you would like.  I chose to do some straight-line quilting that echoes the seam lines of each strip.  


Spiderweb Table Topper quilting

The binding is done the same way you would bind a quilt.  Don't let the points intimidate you :)  I thought it would be a little tricky, but I used bias binding and it finished up nicely!

table topper binding


If you make a spiderweb table topper we'd love to see it!  Leave a comment on this post with a link to the photo (on your blog, flickr account, etc).


Tuesday, August 21, 2012

Back-To-School Project


Today was the first day back to school for many of the local kiddos.  I have to admit, we were not quite ready here at my house.  Just in case you're in the same boat, here's a quick and easy back-to-school project  for some reusable lunch bags using laminate fabrics.  This tutorial is from the Riley Blake Cutting Corners College.  


We have a great selection of cute laminates in the shop.  Any of these would be great for a reusable lunch bag!

Laminate Cotton Fabric


Thursday, August 9, 2012

"Boo" Wall Hanging

This Halloween wall hanging is a fun project and it's easier than you may think.  It's a great way to use up fabric scraps, some orphan jelly roll strips and batting remnants.


Halloween Wall Hanging


"Boo!"  Wall Hanging Tutorial
by Andy Knowlton

(Finished wall hanging is 12" x 47")

Supplies Needed:
6 strips of various fabrics that are 2.5" x 19.5"
1 fat quarter of print fabric for letters (or a piece that is at least 6" x 20")
Solid black fabric:  1/4 yard
Medium ric rac (black):  3-1/4 yards
Backing:  3/8 yard
Batting:  3 squares that are 12.5"
Heat n' Bond Lite or similar product
thin dowels (you need 3 that are about 11.5" long.  I used 3 wooden skewers - the kind that are used for grilling and are found in inexpensive packages at the grocery store.  They're perfect!
Letter Template (download and print from here)


Other supplies to gather:
pencil
scissors - nice and sharp!
rotary cutter and mat
iron


Steps:

1.  Using a 1/4" seam, sew all 6 strips together to form a rectangle that is 12.5" x 19.5"  Press seams to one side.
Halloween fabric


2.  Cut rectangle vertically into strips that are 3.25" wide.  You will be able to get 6 strips.

Halloween fabric


3.  Cut solid black fabric into 3 rectangles that are 7" x 12.5"
4.  Cut medium ric rac into 6 segments that are 13" long each.
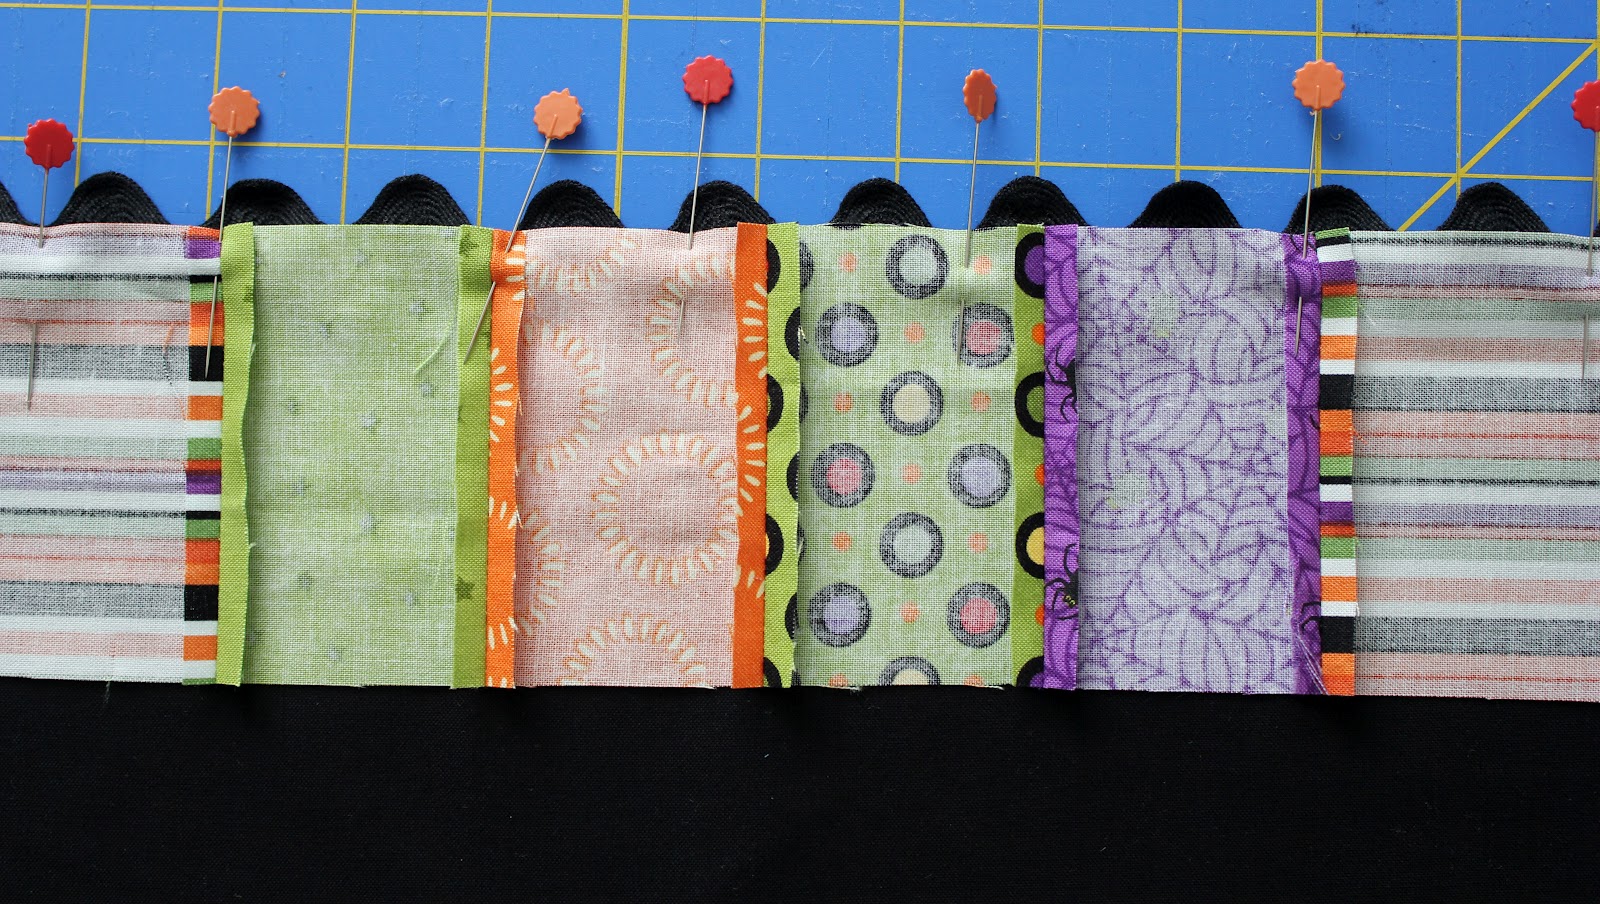
5.  Line up the ric rac with the 12.5" edge of the solid black rectangle.  Align the edge of the fabric with the dip in the ric rac (see photo)

black ric rac


6.  Place one of the colored strips right-side-down on top of the ric rac, also aligning fabric edge with the dip.  The edge of black fabric and edge of colored strip should be even.  Pin in place, being careful to catch both fabrics and the ric rac in the pins - this will help hold everything in place until you stitch.

sewing with ric rac

7.  Stitch, using a 1/4" seam.

8.  Open and press seam so that the ric rac folds to the outside.

sewing with ric rac

9.  Repeat until all three blocks look like this:

sewing with ric rac

10.  Carefully trim the ends of the ric rac that extend past the edge of the block.

11.  Using the letter template, trace the letters onto a piece of Heat n' Bond lite.  Be sure to trace the "b" as it shows on the template.  I know it looks like a "d" trust me though- it needs to be a mirror image during this step!

Heat n' bond lite

12.  Cut out letters using sharp scissors. At this step the letters do not need to be cut out perfectly.  Leave some space around each letter.

13.  Following the manufacturer's instructions, fuse each letter to the WRONG side of the fabric.  Using sharp scissors, carefully cut out letters (this time cut right on the lines!)


Remove the paper backing from each letter:


14.  Lay out all three of your blocks and decide how you would like to place your letters.  

You could do a wonky version:

applique letters

...or all lined up

appliqued letters

Once you are happy with your letter placement, (again using manufacturer's instructions) press each letter in place.

15.  Using a coordinating thread, top stitch each letter in place.  I just used a straight stitch, but a zig zag or blanket stitch would be cute.

top stitching


16.  Cut your backing and batting squares - you need three of each that are 12.5" square.  Working with just the two "O" blocks, you're going to make a quilt sandwich.  First place your square of batting down, then place your block (right side up) and then place the backing square (right side down.)  Pin several times around the square to hold everything in place.  


17.  Sew (1/4" seam) all the way around, pivoting at each corner and leaving about a 4" opening on one side for turning.

18.  Trim corners.


19.  Carefully turn right-side-out, and push out the corners using a bone folder.  Press edges flat.  


20.  Take your thin dowel and insert it into the block between the batting and the backing.  Push the dowel until it is flush with the top.  (If you are using wooden skewers like me, then you'll need to trim off the pointy end and wrap the end with a bit of tape.)


21.  Find the opening in the block, press the raw edges in and whip stitch it closed.  

22.  With the thin dowel pushed all the way to the top of the block, top stitch along the sides - just inside of the ric rac.  Begin at the bottom of the block and sew up as far as you can without hitting the dowel.  This top stitching will hold the dowel in place, anchor the backing in place and add a bit of detail to your finished project.  


23.  For the "B" panel, you will need your backing and batting as well as a piece of ric rac that is  about 18" long.  Place the batting down, place the block (right side up) on top of that.  Place your length of ric rac as shown in the photo below BUT move the ends in a bit to where the red circles are.  This ric rac will become the hanger for the wall hanging and it hangs much better when it is connected closer to the center - I discovered this the hard way :)  


24.  Carefully place the backing square right-side-down and pin in place, making sure to pin the ends of the ric rac as well.  Stitch as you did before (1/4" seam) around the block, leaving a 4" opening.  Clip corners and turn block, pushing out corners.  Press.

25.  Insert thin dowel as you did before, press raw edges of the opening and whip stitch closed.  Push the dowel to the top and top stitch as you did with the other two blocks, stopping when you get close to the thin dowel.  

26.  Now we will connect the three blocks with the remaining ric rac.  You'll need four pieces of ric rac that are 5" each.  Lay out your blocks on a flat surface, right sides down.  Pin two pieces of ric rac to the bottom of the "B" block, lining them up on the line of top stitching.  Pin in place.


27.  Flip block over and stitch again on the same top stitching line, making sure to catch the ric rac end in your stitching.  


This is what it looks like from the backside:


28.  Lay "B" block face down on a flat surface and line up your first "O" block underneath that.  You want about a 2-1/2" space between the blocks.  Pin the bottom of the ric rac to the back of the "O" block, lining it up with the top-stitching line.  Carefully measure both pieces of ric rac to be sure they are exactly the same length.  If they are off, your wall hanging will be a bit crooked.  Flip blocks over to the front and stitch the ric rac in place, again following the previous top-stitching line.  


29.  Repeat steps 26-28 to add the last "O" block.  


Halloween wall hanging


Your wall hanging is ready to hang!  The finished size is about 12" x 47" which is a great size for an entryway  or at the end of a hallway.  If you make a Boo wall hanging we'd love to see it!


Tuesday, July 31, 2012

Are You Ready?


Are you ready to start some Halloween sewing?  Well it's time!  Can you believe it?  School is starting soon, and Halloween is just around the corner.  

In the upcoming weeks we'll be rolling out new project ideas:  trick-or-treat bags, aprons, throw quilts and some decor items to help get your home ready for haunting! 


We've added a new button to the right-hand sidebar of the blog.  See it over there?  Give that a click and it will take you to all of the blog posts (past and present) that are Halloween related.  We'll compile them all in one place to make it easy for you to come back and find some great ideas.


See these rows and rows of bolts?  Yep, that's ALL Halloween fabric.  We can't wait to show you what you can create with them!


Halloween Fabric


Saturday, July 28, 2012

Simple Gifts Baby Quilt


In need of a handmade gift for a new baby?  This is a quick and easy quilt that you can put together in no time at all.  In fact, make a few of these and keep them on hand for a last minute gift.


Fabric Requirements:
1-1/8 yard fabric for quilt front
1-1/8 yard fabric for quilt back
1/3 yard binding fabric
batting:  a piece at least 40" x 40"


Instructions:

For the front and back fabrics, cut both to be 40" square.  Trim your batting so that it is also 40".  Create your quilt sandwich by layering the quilt backing (right side down) then the batting and then the quilt top (right side up).  Baste in place (I prefer to use basting pins but 505 Basting Spray would work well too.  We do carry this in the shop.)


Quilt however you desire, or you could tie it.  For this quilt I did some straight line quilting:


And in this version I machine quilted it in a gentle meandering pattern:


Once the quilting is done you are ready to bind it!  


This a quick and simple quilt to make!  It would  be so cute done in the new "Princess and the Frog" fabrics  or some of the "Don't Be Afraid" line of fabric (both new and in the shop!)


Friday, July 20, 2012

Ruffle Minky Blanket Tutorial


Ruffle Minky Blanket Tutorial
by Trisha Weekes of myfourtrees.com


Ruffle Minky Blanket Tutorial


Supplies needed:
40" of your choice of Ruffle fabric
40" of your choice of Minky fabric
1 pkg of Satin blanket binding (4  3/4 yard)
Matching thread
Temporary Spray adhesive

Stick Pins
Rotary Mat and Cutter

Notes:

Our blanket is going to be 40" squared- its a very generous size for a baby blanket. We've made it this size for a couple of reasons: 1) we only have to purchase 1 satin blanket binding package 2) not too big and not too small!

You could make it larger, however the ruffle fabric is only 54" wide and the minky is 60". If you're interested in a lap size blanket (54x54 or 54x60 or longer) you'll just need to purchase the extra yardage and satin blanket binding.

*A couple of side notes: both fabrics are polyester and wash wonderfully! Just remember NO fabric softener for the minky- it will gum up the fibers and no longer be soft!*


Steps:


Ruffle Minky Blanket Tutorial


1-     The first step I always do before I begin a project is to square up the edges that have been cut at the fabric store, especially if it was cut with scissors. I basically take the selvedge edges, line them up, place them on the line of the cutting mat, smooth out the fabric and make the cut edges even by trimming off the excess or uneven edges with my rotary cutter and mat. Then I cut the desired measurements, 40" square.  This will be the base for our blanket so it must be square. Remove the selvedge edges from the minky.


Ruffle Minky Blanket Tutorial

2- Even up the top CUT edge of the ruffle fabric (not the selvedge).  There is a natural line in the fabric to follow. Place it on the wrong side of the minky fabric (wrong sides together).  The minky has a nap to it- double check to make sure the nap is running down not up.  Also check to make sure the ruffles are running down as well.  Align the two fabrics, pin if necessary.  Leave an inch (the selvedge edge) to be trimmed off later, and begin a line of sewing.  Sew 1/4" or presser foot width, down the top side. Now you'll have an excess of 12-13" on one side.  You may trim it now, but I prefer to trim it after I've glued and sewn it to the minky.


Ruffle Minky Blanket Tutorial


3- Our next step is to temporarily glue the ruffle fabric to the minky.  You may need an extra set of hands for this step. (not pictured) Open up the two fabrics, seam at the top.  Lay the heavier minky fabric down on a flat surface. You should be looking at the wrong sides of both fabrics.  Spray onto the minky a 4" width line of the spray adhesive. With a temporary spray you should have time to even out any bubbles. Continue doing a line at a time until the entire ruffle fabric is glued down to the minky. You can trim off the excess fabric now or wait until  you sew all edges of the ruffle fabric to the minky. *Very important* make sure as you sew to keep the ruffles flat and going in the right direction.


Ruffle Minky Blanket Tutorial


4- Sew all of the edges down of the ruffle fabric to the minky, trim off the excess if you haven't done so yet.


Ruffle Minky Blanket Tutorial

5- Since the spray adhesive is only temporary we're going to sew some stay stitches throughout the length of the blanket. I followed the lines in the fabric.  Every 6 ruffles, I lifted the ruffle and stitched the width of the blanket. I had seven rows of stitches.  This will help to keep the fabric from shifting while being laundered or loved.


Ruffle Minky Blanket Tutorial


Ruffle Minky Blanket Tutorial


6- Our next step is to apply the 100% polyester Satin Blanket Binding. There are many tutorials online, check your manufactures website for specifics. I will not be giving the instructions here for that, maybe some other time. I did miter my corners and did a biased seam to close it up. I also top stitched the satin binding twice, because I have found that it can come off easily. Again, just make sure you keep the ruffles going in the right direction, as you sew!


Ruffle Minky Blanket Tutorial


I hope you have a chance to make one of these sumptuous blankets either for yourself or a lucky baby in your life.  It is sure to become a favorite. It's light and airy but adds warmth and so much beauty. Come into the store and see it in person, then browse the great selection and colors of both fabrics.


Ruffle Minky Blanket Tutorial