Showing posts with label Children. Show all posts

Friday, May 13, 2016

Northcott


  Skater
  So excited for this AWESOME new Skater line from Northcott!


-Connector Play Mats-
Ok!! These play mats are to die for! With 4 different fun road maps that can connect together for a single size quilt top, or use separately! 


Wednesday, October 21, 2015

School Days fabric

School Days fabric 1

I love this fun and playful School Days fabric from Riley Blake. 

school days

And check out this charming quilt pattern – which is a free download from the Riley Blake website!

Learn Your ABC's quilt pattern

Monday, October 19, 2015

Dream and A Wish

Dream and a Wish fabric at The Fabric Mill

Dream and A Wish is a new fabric line from Riley Blake and it’s perfectly suited for those little princesses in your life.

Full of pretty pastel colors, dresses, flowers….

Dream and a Wish fabric at The Fabric Mill 

…and even castles…

Dream and a Wish fabric at The Fabric Mill 

And Riley Blake has a free quilt pattern on their website right now.  Aren’t these dresses adorable? 

Pretty Little Dresses quilt pattern
Click here to print the pattern – then bring it into the shop to pick up the fabrics you’ll need!


Wednesday, August 26, 2015

Disney Princess Fabrics

Disney Princess fabric panel

Is there a little girl in your life who loves princesses?  We now have fabrics with everyone’s favorite princesses – Sleeping Beauty and Cinderella!

Disney Princess fabric 4

In both blues and pinks these prints remind us of our favorite scenes from these movies.

Disney Princess fabric 1 

Disney Princess fabric 2

I think these would be fun as pillowcases!

Disney Princess fabric 3

Monday, July 6, 2015

Happy Sunshine

 
Happy Sunshine charm packs at the Fabric Mill 

We love this new Moda line called “Happy Sunshine."

Happy Sunshine from Moda

We have charm packs available as well as a few bolts of yardage.  This new line would be so cute used in our “Bugged Out” pattern:

Bugged Out quilt pattern from The Fabric Mill

This charm-pack-friendly pattern is free with purchase.  It requires one charm pack plus some yardage for the sashing and borders.  (Finishes at 44” x 50”)


Tuesday, June 30, 2015

Little Flyers

Little Flyers fabric 

Little Flyers (Riley Blake) is now on the shelves and ready for some fun projects!  Check out these whimsical prints:

Little Flyers fabric

We have the full line in yardage, and charm packs as well.  How cute are all of these little airplane prints??

Monday, April 6, 2015

Rodeo Rider Fabric

Rodeo Rider fabric 3

Rodeo Rider fabric is here!  This fun line from Riley Blake is one of our newest lines here at The Fabric Mill. 

Rodeo Rider fabric pink and mint 

We have both the pink / mint colorway, as well as the blue and red -

Rodeo Rider fabric red and blue 

We also have flannels from the Rodeo Rider line! 

Rodeo Rider fabric 4

Perfect for those cowboy and cowgirl projects!

Need ideas?  How about a cute little skirt for your favorite cowgirl?

Rodeo Rider fabric skirt

Or this fun Rodeo Rider quilt pattern, which is a free pattern from Riley Blake’s website.  Click here to go to the downloadable pattern.

Roder Rider quilt pattern


Wednesday, November 26, 2014

The Year of the Ninja


The Year of the Ninja is a new fabric line from Riley Blake.  These fabrics would be great for any project for those 9-12 aged boys who are often tough to sew for.  In fact, both my boys need new pajama pants this year.  I’ll use the little ninjas for my youngest son, and the throwing star print for my oldest.  Perfect!

Year of the Ninja

How about some other gift ideas for that age group?  (click on the word to go to the tutorial)  What about an ipad cover, a pillowcase, a necktie, a lunch money cuff, a drawstring backpack, On the go reading pillow, or a snap-shut pencil case.  Any of those would be so great in these Ninja fabrics!

Year of the Ninja fabrics


Wednesday, September 10, 2014

Monsters!

 Monsters?  Yep - cute ones!  The silly, googly-eyed monsters are the best part of this quilt.  All sorts of bright and fun prints are paired with the monsters to make an adorable kids' quilt.

Building Blocks quilt pattern made with cute monsters fabric!

The finished size is 42" x 49" and the pattern can be found in this book called Little Quilts 4 Little Kids (by Heather Mulder Peterson).  We just love this book - it's full of such wonderful quilt patterns - all for kids!

Little Quilts 4 Little Kids quilt pattern book by Heather Mulder Peterson


The kit can be purchased for $35.50 either by stopping by The Fabric Mill or by calling 801-225-3123.  

Monsters quilt kit found at The Fabric Mill

Wednesday, September 3, 2014

We’ve got Olaf!

Frozen Snowman Flannel

I’ve just gotten word that Olaf has arrived at The Fabric Mill!  We have bolts of this print in flannel only and I'm fairly sure it's not going to last long!


Monday, August 25, 2014

Under The Sea Baby Quilt (free tutorial)


Last week I used some of the In the Ocean fabric to make a quick baby gift for a friend of mine.  I used the Simple Gifts Baby Quilt Tutorial and whipped it up in no time!

simple gifts baby quilt v2 600px

This sweet quilt finished at 38” x 42” which is a great size for a little one.

Want to make one too?  Here’s what you’ll need:
First of all, the tutorial can be found here.

1-1/4 yard front fabric**
1-1/4 yard backing**
1/3 yard binding
batting: a piece at least 42” x 42”

**The original tutorial calls for just 1-1/8 of each fabric but for this quilt I bought 1-1/4 of both the front and the back because I needed to work around those squares.

simple gifts baby quilt v2a 600 px

The cheater print makes this quilt look like a cute Ocean-themed patchwork quilt!


Here are the rest of the In The Ocean prints.  I think any combination of these fabric would make a cute Simple Gift Baby Quilt!

in the ocean fabric line


Friday, June 20, 2014

Chance of Flowers Wall Hanging and Kit

 Isn’t this sweet?  This wall hanging is made using a panel from the Chance of Flowers line of fabric (Moda).  It would also make a perfect crib quilt for a new little one.  And because it's made from a panel, it is quick to sew up! 

The finished wall hanging measures 27" x 36"

chance of flowers wall hanging

We have kits available too!  Each kit costs $19 and contains all of the fabric needed (front + back) plus the cute ric rac for the edging. 

chance of flowers wall hanging kits

Kits can be purchased in-store, or over the phone by calling 801-225-3123

Monday, March 10, 2014

Rocket Age

Rocket Age fabric from Riley Blake now at The Fabric Mill

We have Rocket Age!  This adorable line from Riley Blake is filled with old-school charm.  I love this main print – it makes me wish my boys were young again!

Rocket Age fabric from Riley Blake now at The Fabric Mill

As always, we have fat quarters cut and ready for your next project!

Rocket Age fabric from Riley Blake now at The Fabric Mill

And speaking of projects, Riley Blake has a free pattern for you to use with the Rocket Age fabrics.  How cute are these stars?

Free quilt pattern using Rocket Age fabrics

Here’s the link to the pattern.  Print it at home and then stop by the Fabric Mill to gather all of the fabrics you’ll need to make this quilt. 

Wednesday, December 4, 2013

Dr. Seuss Quilt and Kit

Seuss Quilt Kit from The Fabric Mill

I’m back again today with another great quilt kit.  This one makes a really fun throw-sized quilt that is perfect for any kid (young or old!)

Fun Dr. Seuss Quilt from The Fabric Mill

This quilt kit is $66.50 and includes all fabric needed for the quilt top and binding.  The adorable pattern comes from the “Nested Owl” book by AdornIt.  

Thursday, November 7, 2013

Christmas Minky and Cuddle fabrics


These are three of our newest Minky / Cuddle fabrics – aren’t those snowmen so cute?

Cuddle Fabrics at The Fabric Mill

I used two of these fabrics to make a quick and easy double sided minky throw:

adorable double sided Minky throw blanket

Soft, snuggly and a great quick-to-finish project!

adorable double sided Minky throw blanket

This throw is currently hanging on display in the shop so you can stop by and see it in person.  I checked out a couple of great tutorials before I made my blanket – you can see them here on our Minky / Cuddle idea board on Pinterest.

Tuesday, July 9, 2013

Pennant Party Skirt pattern

Pennant Party Skirt

Isn’t this the sweetest little skirt?  This new pattern (Pennant Party Skirt from Trisha Weekes) was made using the red “little border” print from the Little Red Riding Hood line by Riley Blake.  Remember this tote bag?  That was made with the same print, just the pink version. 

We have everything you need to whip up one of these sweet skirts for your young lady!

Pennant Party Skirt pattern

Tuesday, June 25, 2013

Red Riding Tote–tutorial

I am loving the Little Red Riding Hood fabrics from Riley Blake.  This "little border" print was just begging to be made into a tote bag!  The bag finishes at 9" x 9" x 3" which is the perfect size for your favorite 3-7 year old young lady:

Little Red Riding Hood tote bag tutorial

and is just right for carrying a few favorite books and a beloved friend on a trip to Grandma's house:

Little Red Riding Hood tote bag tutorial


Red Riding Tote tutorial
by
Andy Knowlton


Red Riding Tote tutorial from the Fabric Mill


Materials Needed:

3/4 yard of Little Red Riding Hood “Little Border” print (Riley Blake)**
1/8 yard of one coordinating print (this is optional)
two (11” x 13”) pieces of fusible fleece

**this is the “little border” print.  The print is currently available in both red and pink at the Fabric Mill.**
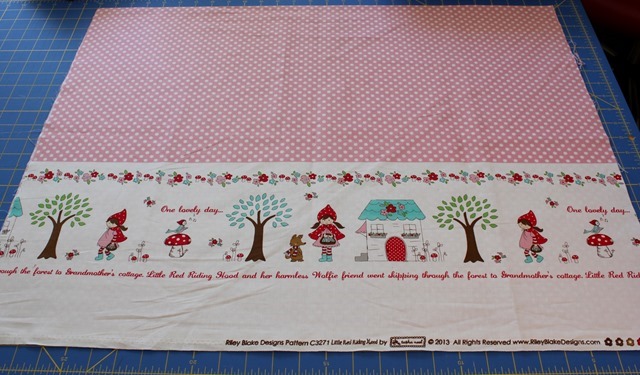
red riding hood little border pink

Step 1:  Take the 3/4 yard of “Little Border” print and unfold it.  Line up your ruler so that the 1/2” marking line lies directly under the line of words (see photo.)   Trim along that edge.

tote 1

tote 2


Step 2:  Following the cutting diagram, cut all of the following pieces

2@ 13” x 19” (with the border along the 13” edge)
2@ 4” x 18” for handles
2 @ 3.5” x 13” for bag bottom (option: this can be cut from a coordinating fabric instead)

cutting layout


Step 3:  Using a 1/4” seam, sew the two 3.5” x 13” bag bottom strips to the bottom edge of each of the 13” x 19” main bag pieces.  (I used a coordinating fabric for the bag bottom.)  Press seam.

Tote Bag tutorial


Step 4:  Fuse the 11” x 13” piece of fusible fleece to the wrong side of each of the main bag pieces.  The fusible fleece needs to be on the bottom half of the bag.

 Tote Bag tutorial


Step 5:  Place main bag pieces right sides together. 

tote 6

Be sure that these lines (printed on the fabric) match up. 

tote 7

Pin around the bag along the edges.  Along the top edge we will be leaving about 5” open (unsewn).  I like to mark those spots with double pins to remind me not to stitch there.

Tote Bag tutorial

Using a 1/4” seam, Sew around edge of bag, pivoting at corners and leaving about 5” open for turning.


Step 6:  To create the flat bottom on this bag, on one corner match seam line to seam line and mark 1.5” down from the point.  Sew along the marked line (which should measure about 3” long). 

Tote Bag tutorial

Repeat for all four corners:

Tote Bag tutorial

Then trim each corner about 1/4” from stitching:

Tote Bag tutorial

Step 7:  Turn bag right side out and push out each corner:

Tote Bag tutorial

Step 8:  Sew the 5” opening closed by pressing first and then carefully sewing along the edge.

Tote Bag tutorial

Step 9:  Push bag lining into bag, press along top edge of bag and then stop to admire your handiwork thus far!
Red Riding Hood tote bag tutorial


Red Riding Hood tote bag tutorial

Step 10:  Now for the handles!  Press up 1/2” on each end of both handles:

Red Riding Hood tote bag tutorial

Fold (and press) in half lengthwise.  Then unfold and press the outside edges in to the center. 

Red Riding Hood tote bag tutorial

Then fold again on center line and press:

Red Riding Hood tote bag tutorial

Step 11:  Sew along each edge of the handles a scant 1/8 from the edge:

Red Riding Hood tote bag tutorial

Then sew down the center of each handle:

Red Riding Hood tote bag tutorial

Step 12:  Pin the ends of the handles to the inside of the tote bag, 2.5” from the side seam. 

Red Riding Hood tote bag tutorial

Stitch handles in place, making sure to use a coordinating thread because this will show on the outside of the tote!

Red Riding Hood tote bag tutorial

Little Red Riding Hood tote bag tutorial

Your lovely tote is complete and ready to be used and loved!