Showing posts with label Handmade Holidays. Show all posts

Friday, December 13, 2013

Christmas décor: Winter’s Lane banner and pillow project

There’s just so many fun things going on around the shop these days that I have a hard time keeping up!

This gorgeous pillow is one of my favorite display items this month.  Heather made this pillow for us using a panel from the Winter’s Lane fabric line (Moda).


Winter's Lane pillow project

With the pillow panel you’ll get this project booklet that will show you how to make the pillow as well as the sweet Winter’s Lane banner.   

Winter's Lane pillow project sheet

You can see more of the Winter’s Lane fabrics here and here.  See you soon!

Wednesday, December 11, 2013

Gift idea: Family Tree wall hanging


This Family Tree wall hanging would make a wonderful gift this Christmas!  I made this one for my mom and dad, and I put all of their grandchildren’s names on the little birds in the tree.

family tree wall hanging

The center portion of the wall hanging is printed as a panel, which makes everything so quick and easy!  You cut out each little bird and (using a fusible web) iron them on to their spot on the tree.  I used a Micron pen to write names on each bird.

family tree panel from Moda

Free instructions for making the wall hanging are available with purchase of the tree panel!  The instructions will let you know how much of each fabric you need for the border, binding and backing as well. 

These are the other fabrics from the Family Tree line.  It was designed by Deb Strain for Moda fabrics.

family tree fabrics from Moda


Monday, December 9, 2013

Gift idea: snap bags!

snap bag tutorial

Every year there are a couple of people on my list that are SO difficult to buy Christmas gifts for.  This year two of them are women and I’m just racking my brain trying to think of something meaningful, thoughtful, and/or useful to give.  Can you tell I’m a fairly practical gift giver?  I try to give handmade gifts when I can and so when I saw this great snap bag display that Laura made I knew this fit the bill! 

Laura used three prints from the Winter’s Lane fabric line from Moda to make this snap bag. 

Have you seen these?  They are so clever!  The top closure is made using metal tape measure pieces.  Next time you stop by the shop be sure to go and check out this bag.  It’s so fun to play with. 

snap bag tutorial

These bags are easy to open and close --perfect for little fingers or also for adults who have difficulty with the pinching motion that zippers and snaps require.   

I found two fantastic (and free!) snap bag tutorials for you:


These two tutorial as well as 20 other great bag, tote and purse tutorials can be found on our pinterest board!  It’s full of great gift ideas.  Go check it out, find your favorite tutorial and then stop by the Fabric Mill and we’ll help you pick out the perfect fabrics for your project. 

Saturday, November 30, 2013

Speaking of Aprons…

I meant to share this post a few weeks ago during the shop hop but never got the chance.  It’s still full of great ideas though so I’ll share it now! 

If you had the chance to stop by during the shop hop you probably noticed our shop was decked out in aprons – aprons of all kinds. 

Cute aprons on display

We’ve had fun re-making some of our favorite apron patterns in the newest fabric lines!

We are heading into the holiday season when so many of us spend more time in the kitchen.  Time for a new apron – either for yourself or to give as a gift to the chef in your life.  Here are our top 5 favorite Apron patterns – we carry all of these patterns in the shop!

Flirty Skirty apronOoh La La Apron
Strawberry Licorice Apron and pattern
The Sassy Little Apron and pattern!
Easy Peasy Apron and pattern!

To see even more apron inspiration, be sure to follow our Apron pinterest board which is full of all sorts of great apron tutorials.  We will continue to update and add to the board as we discover new fun apron tutorials!


Tuesday, November 19, 2013

Christmas Gift Idea

If you’re like me, you’re starting to make “gift idea” lists for the important people in your life.  Christmas is a few short weeks away, but there’s still time to get those handmade gifts completed.  I have a great one for you today – it’s an easy infinity scarf and we have a nice selection of fabrics on hand at The Fabric Mill and a free, online tutorial to help you create your own!

infinity scarf

This buttery-soft scarf is on display at the shop and was made by the very-talented Heather.  She used the tutorial that you can find here.  I have two nieces and a sister that would love to receive one of these on Christmas.  And since we’re making lists, why don’t you go ahead and add MY name to that list.  I would love one of these too!  *hint hint*

Thursday, November 14, 2013

Christmas is Everywhere!


As I’ve been in various shops and stores over the past few days I have to say how surprised I am that a lot of them are playing Christmas music already!  Christmas is everywhere!  We don’t have the music yet, but we certainly have the Christmas décor! 

This adorable ruffle pillow is from the “Long Live Vintage” book from Adornit

Cute ruffled Christmas Pillow

I love how the raw edges are left on the ruffles:

Cute ruffled Christmas Pillow

And in the shop we have everything you need to make your own Christmas ruffle pillow – including the cute wooden buttons!

Cute ruffled Christmas Pillow

Wednesday, November 13, 2013

A Lovely Christmas Quilt

Back in July I showed you the new Winter’s Lane line from Moda – full of gorgeous reds, calming grays and spearminty blues.  It’s my favorite Christmas line this year. 

Just Can't Cut It Christmas quilt

Our own very talented Laura made this pretty quilt using Winter’s Lane and the “Just Can’t Cut It” pattern.

Just Can't Cut It pattern

This is one of our most popular patterns in the store because it is quick to sew up and works with nearly any fabric. 

Thursday, November 7, 2013

Christmas Minky and Cuddle fabrics


These are three of our newest Minky / Cuddle fabrics – aren’t those snowmen so cute?

Cuddle Fabrics at The Fabric Mill

I used two of these fabrics to make a quick and easy double sided minky throw:

adorable double sided Minky throw blanket

Soft, snuggly and a great quick-to-finish project!

adorable double sided Minky throw blanket

This throw is currently hanging on display in the shop so you can stop by and see it in person.  I checked out a couple of great tutorials before I made my blanket – you can see them here on our Minky / Cuddle idea board on Pinterest.

Saturday, December 29, 2012

iPad Cover Tutorial

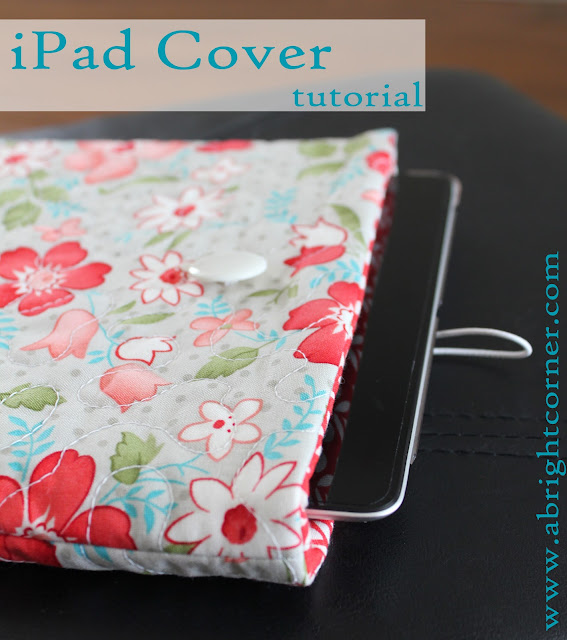
Did you or a family member become an iPad owner this Christmas?  Then you'll need one of these!  I've had one of these quilted iPad covers for awhile and I love it.

This particular cover is what I would consider a comfortable size.  This is not a tight-fitting cover.  I wanted it to be easy for my kiddos to use this.  I can grab it on the way out the door and quickly slide the ipad in without a struggle.  The elastic closure and button ensure that the iPad is snug inside and well protected.  If you would like this to be a tight fit, increase your seam allowance to 1/2".

iPad cover tutorial

iPad Cover Tutorial
by
Andy Knowlton


Materials Needed:
2 Coordinating Fat Quarters
button
6" or so of thin elastic
thin batting

Cutting Instructions:
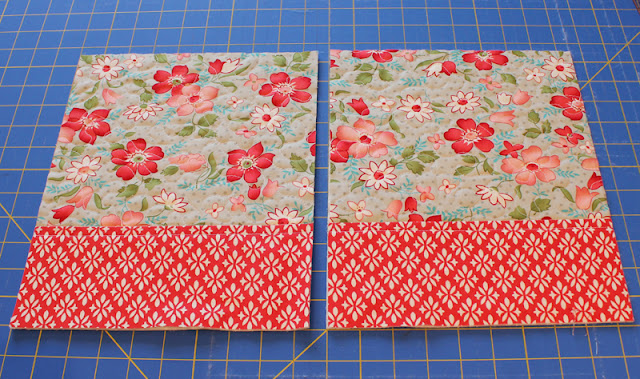
  • From one of the fat quarters (this is for the cover lining/inside) cut 2 pieces that are 9.5" x 11.5" and then two pieces that are 4" x 10" (this is for the pieced outer cover)
  • From the second fat quarter cut two pieces that are 9" x 10" (This is also for the pieced outer cover).
  • Batting: Cut two pieces that are 9.5" x 11.5" and two that are at least 10" x 12"


iPad cover using fat quarters


Step 1:
We will first make the outer cover.  Sew each of the 4" x 10" pieces to the 9" x 10" pieces.  Press. 

Step 2:
Place the outer cover pieces over the batting pieces that are 10" x 12."  Baste using a few basting pins or using a bit of basting spray.  

iPad cover using fat quarters

Quilt as desired, then trim both pieces to be 9.5" x 11.5"

iPad cover using fat quarters

Step 3:
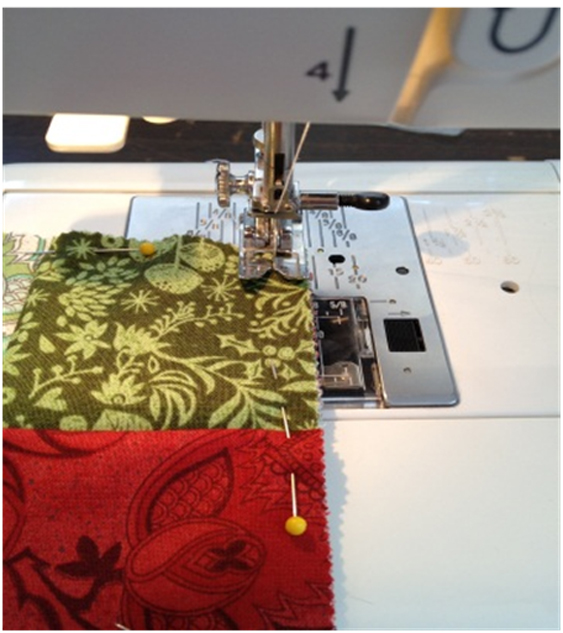
Place the two outer cover pieces together (right sides together) and pin.  Be sure to line up those seam lines (see photo below).  When you get the cover finished it will be obvious if these seam lines are not matched up.  Sew the two outer cover pieces together (using a 1/4" seam) along the sides and bottom, pivoting at the two bottom corners.  Leave the top open.  Clip the corners to reduce bulk.

Turn outer cover right-side-out.  Gently push out the corners (I use the tips of a blunt-edge pair of scissors.  A car key would work as well.)

iPad cover using fat quarters


Step 4:
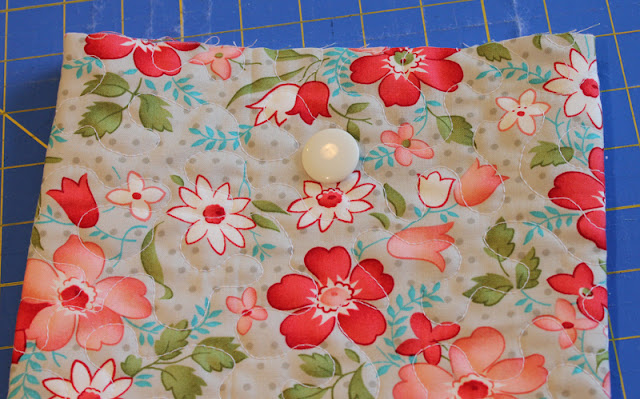
Sew on your button in the center of one side and about 2" down from the top edge.

iPad cover using fat quarters

Step 5:
Now we are going to work on the lining.  Layer a piece of batting, then one of the lining pieces (right side up), then another lining piece (right side down), and then the final batting piece.  The two lining pieces should be right-sides-together with the batting pieces on the outsides.  Pin together around all edges.

iPad cover using fat quarters

This next step is optional - but I find it helpful!  At the bottom edge of the batting, cut a notch out that is about 5" long and about 1/4" high.  Trim JUST the batting - not the lining fabric.  Repeat for both pieces of batting.  (Cutting this notch will help reduce bulkiness when you are stitching the opening closed.)

iPad cover using fat quarters

Sew 1/4" seam along the sides and bottom of the lining/batting sandwich, stopping at the notched section of batting (or at about 2" in from each side.)  Leave the notched section unsewn - this is where you will turn the cover right-side-out.  Leave the top open as well.  Clip the corners to reduce bulk.

Step 6:
Place the outer cover (right side out) inside the lining so that the two (inner and outer cover) are right sides together.  

Match side seams and pin in place all along top edge.  

Measure the amount of elastic you will need (this depends on the placement and size of your button).  Place the piece of elastic loop-side-in, between the lining and outer cover on the opposite side of where the button is.  Pin elastic in place.

iPad cover using fat quarters

Step 7:
Sew (using 1/4" seam) around the top edge of the cover, catching the ends of the elastic.  After you have sewn around the whole top edge, trim the ends of your elastic.  Mine were obviously WAY too long. 


iPad cover tutorial

iPad cover tutorial


Step 8:
Through the opening in the bottom of the lining (remember that notched section of batting?) turn the cover right-side-out.  Find the bottom edge of the lining that is unsewn.  Fold the raw edges in about 1/4" and stitch the opening closed.  This is where the notched batting helps reduce bulk and make this stitching easier.  


iPad cover tutorial

Step 9:
Push the liner inside of the outer case.  Reach in and push the corners in and smooth the liner so that it lays flat inside of the cover.  I like to press the edge of the top opening to help it to lay flat as well.  

iPad cover tutorial


iPad cover tutorial

And there you have it-- a personalized iPad case to take with you everywhere you go!  I love mine so much, but the guys in my family had a problem with the flowers.  So I made a more masculine version to appease them.  

iPad cover tutorial


Wednesday, December 19, 2012

Holiday Mug Rug Tutorial

How are your Christmas projects coming along?  Are you still looking for a few last minute gifts - maybe a quick handmade item for a teacher or favorite neighbor?  Today's tutorial would be the perfect thing!

Trisha has written a tutorial showing you how she created her Holiday Mug Rugs (on display at the store.)


Holiday Mug Rug tutorial
by
Trisha Weekes


Materials Needed:

1 Pack of Charm Squares- I used Blitzen by Basic Grey for Moda (or 5” square scraps)
Coordinating Thread
Batting remnants 5” squares *optional

This project is both quick and cute! 

Step one- Opening the charm square is probably the hardest part for me, not because it’s physically impossible, but I just like to see them stacked together all nice and pretty! Anyone else have that problem? Anyhow, choose 5 squares that you like together, 1 for the back and 4 for the front. Put your favorite in the middle face up, and the four to each side; like shown in the photo. If you want to add the batting, do so now, underneath your middle square.

Holiday Mug Rug tutorial - quick and cute!

Step two through four- You’re going to fold the fabric from each side in half and place it on the middle square with the fold towards the center of the square and all the raw edges facing out. Pin at each corner.


Holiday Mug Rug tutorial - quick and cute!


Holiday Mug Rug tutorial - quick and cute!

Holiday Mug Rug tutorial - quick and cute!

Holiday Mug Rug tutorial - quick and cute!


Step Five- When all 4 squares are folded and pinned, Lift up the first fold and tuck in the fourth fold, like when closing a box. Pin again.

Holiday Mug Rug tutorial - quick and cute!


Holiday Mug Rug tutorial - quick and cute!


Step six-
Next I pin all 4 sides, just to make sure nothing slips as I sew. It’s optional. Sew all around the square, no need to leave an opening for turning, it’s in the middle!

Holiday Mug Rug tutorial - quick and cute!

Holiday Mug Rug tutorial - quick and cute!


Step seven-
Trim the corners and threads.  I trim quite a bit, to reduce the bulk at the corners.

Holiday Mug Rug tutorial - quick and cute!


Step eight-
Open the center folds and turn inside out, with a bone folder push out your corners. You have 5 layers of fabric, 6 if you choose batting; you want a nice creased corner. Top stitching is also optional.

Holiday Mug Rug tutorial - quick and cute!


Holiday Mug Rug tutorial - quick and cute!

Ta-da! You’re done! Simple, easy and oh so cute! A packet of charm squares will yield 8 mug rugs. Package with some packets of hot cocoa, maybe a new mug, and voila a great gift to give to neighbors or friends. Enjoy!

Holiday Mug Rug tutorial - quick and cute!