Showing posts with label Halloween. Show all posts

Monday, October 20, 2014

Halloween Wall Hanging


It was so fun to see so many of you during our shop hop last week!  As we are getting this week started, I wanted to pop in and show you one of our new wall hanging samples.  This cute wall hanging is made from a panel so you know it’s got to be a fast project.  My favorite part?  It lights up!  See the little lights around the word, “BOO”?  They blink on and off.  We have both the panel and the pattern for this cute wall hanging – and a Christmas version as well! 

halloween wall hanging

And here’s one more quick addition to your Halloween décor – a pennant banner!  These cute holiday banners are made by Riley Blake and come in many color combos.  Here are two tutorials on how you can put these pre-printed Halloween banners to good use! (click on the text to be taken to the tutorials)

Quick and Easy Double Sided Halloween Banner

Cindy & Jina’s Pennant Tutorial (video)

Holiday banners

Monday, September 8, 2014

Halloween Time

So I just counted and we have a short 7.5 weeks left until Halloween.  
Time to start getting your Halloween decor ready!  

How about a cute Halloween quilt?  This one is now available as a kit!  This quilt is 64" x 79" and makes a cute throw quilt to toss over the back of your sofa this time of year.  

Really cute Halloween quilt on display at The Fabric Mill

The kit is $53.50 and is available at the shop, or by ordering over the phone (801-225-3123)

Halloween quilt kit

Looking for more fun Halloween ideas?  How about these:

Cute Halloween table runner
Cute Table Runner (Mrs. Bindweed's Boots pattern)

trick or treat bag tutorial
Trick or Treat Bag Tutorial

spider web table topper tutorial
Spider Web Table Topper tutorial

Need even more ideas?  Check out our Halloween Pinterest board!


Friday, June 27, 2014

Don’t Look Now….

I don't want to alarm you, but just so you know…we have Halloween fabrics in stock.

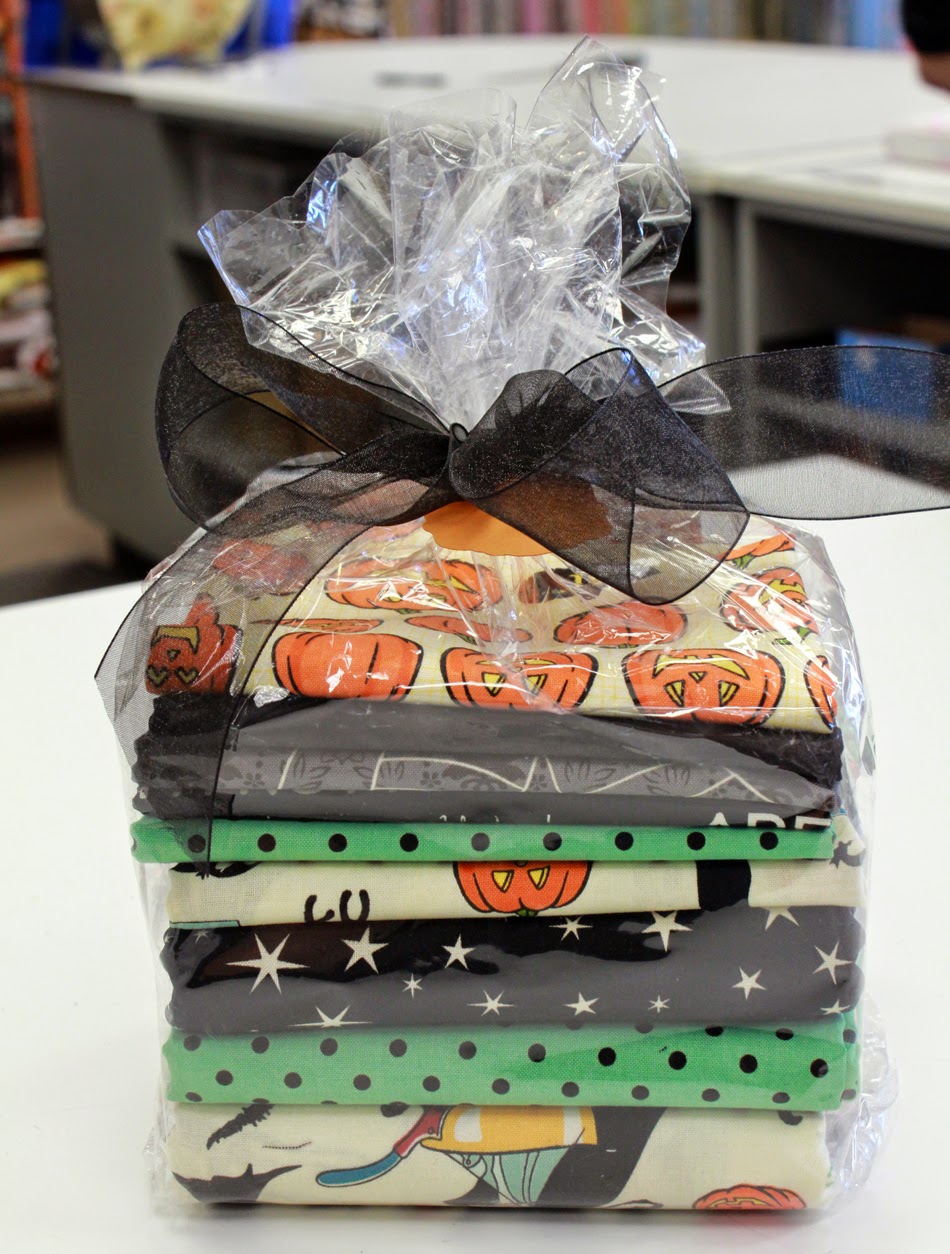
  Halloween Fabrics at the Fabric Mill

The Halloween prints are rolling in and we’re starting to (already) look towards fall.  Don’t panic though!  You still have plenty of time to plan your fall projects.  But to get the ideas flowing, I suggest you stop by and see these great prints.

Halloween Fabrics

Monday, September 30, 2013

Cute Halloween Table Runner

Today I thought I would share with you this really cute Halloween table runner that we have on display this month!

Cute Halloween Table Runner via The Fabric Mill

The pattern is called “Ms. Bindweed’s Boots.”  The table runner’s finished size is 15.5” wide and fits a table up to 76” long with a 15” drop.  The adorable witch’s boots hang off of both ends of the table runner and the pattern gives you the chance to add a lot of charm with the details:

Cute Halloween Table Runner via The Fabric Mill

We have the patterns in stock as well as a great selection of Halloween fabrics to make it easy for your to create your own pair of “Ms. Bindweed’s Boots!”

Ms. Bindweed's Boots Table Runner via The Fabric Mill Blog

Do you already have a Halloween table runner?  No problem!  There’s a Christmas version of the table runner pattern.  This one is called “Jingle Boots” and we have these in stock on the pattern wall.  So cute!

Jingle Boots Table Runner via The Fabric Mill Blog

Wednesday, August 28, 2013

Halloween!

Time to start thinking about Halloween projects (if you haven’t already!)  We have a variety of Halloween project tutorials and ideas available here on our blog.  See that “Handmade Halloween” button in the sidebar?  Click that and it will link you to any project/tutorial that is Halloween related!

We’ve got our display hutch stacked to the brim with even more Halloween ideas:

Halloween quilt shop display

How about whipping up some cute Halloween pillow cases for your favorite ghouls and goblins?

halloween pillowcase

We make it easy for you – pillowcase kits are ready to go!

pillowcase kit

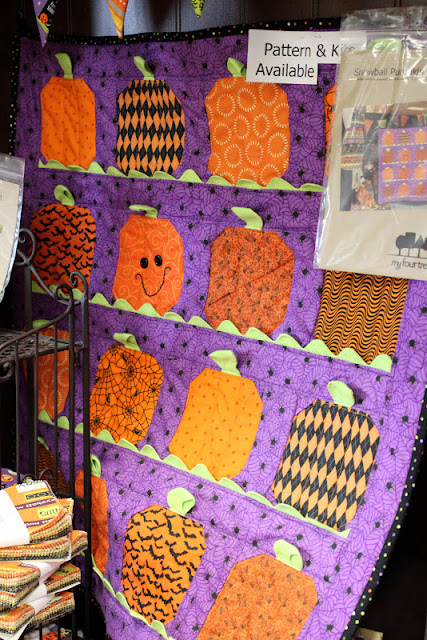
And we have the patterns to make this cute pumpkin wall hanging:

Snowball Pumpkins pattern

The pattern for this quilt can be found in the book from Adorn It that I wrote about here

Halloween quilt

And see the cute ruffle pillow that is leaning up against the bottom of the quilt?  That is also from the Adorn It pattern book and that pillow uses the leftover fabric from the quilt!  Such a clever design!

Stop by and get inspired!

Monday, August 12, 2013

Posh Pumpkins Project

Posh Pumpkins project

We’ve recently changed some of our displays to reflect the upcoming season.  Is everyone ready for fall, back-to-school time and Halloween?  We are!  One of our new display items is this quick and easy project using Posh Pumpkins (Moda). 

The pattern is called “Peak Color”.  It makes a 27” x 29” mini quilt that you could use as either a wall hanging or table topper.  I love it because it’s not specifically for Halloween or Thanksgiving, so you really can use it from September all the way through to the end of November. 

Peak Color Pattern

Here at the shop we have the patterns, charm packs and other necessary fabrics for you!  I was able to get the quilt top done in about 90 minutes.  Honestly, the most time consuming part of the project was cutting out the twelve circles but that can be done while watching your favorite movie. 

Posh Pumpkins fabric

Stop by the shop and get everything you need to get started on this cute fall project!  See you soon!

By the way, we love to see the projects you make!  Share something you've made using fabrics from our shop -- send it through email (fabricmillblog@gmail.com) or on facebook page!

Wednesday, October 24, 2012

Trick or Treat


What a great time we had a the shop hop last week!  It was so fun to meet so many of you and hear what you are working on.  

Now the countdown to Halloween has begun - 1 week left!  There's still time to put together a few more projects to get your house ready for the big day.  We are out of kits for this cute wall hanging, but the pattern is still available.  This would be great hanging in your entry way or decorating your table top for this last week of October!


Fabric Mill: Pumpkins Wall Hanging


We also have just a couple more of these Monster Quilt Kits.  So, so, cute!  
(The finished quilt measures 43" x 51") 

Fabric Mill:  Monster Quilt Kit


Right now all of the Halloween fabrics are $3 off per yard so it's the perfect time to stop by the shop and get the fabric you need to make some trick-or-treat bags or a spiderweb table topper (instructions for both are free here on our blog!  Click on the "tutorials" tab.)


Fabric Mill:  Trick or Treat Bag Tutorial


Fabric Mill:  Spiderweb Table Topper Tutorial


Wednesday, September 12, 2012

Halloween Spider Apron

Check out this cute spider apron I spotted -


Halloween Spider Apron


The body of the spider is a pocket and the head of the spider is a large button.  So creative!  This pattern was created by Phyllis Dobbs and is available free online here.  Print out a copy of the pattern and bring it in to the shop.  We'll help you gather everything you need!  


Friday, September 7, 2012

Halloween Quilt Kit

This is one of our newest quilt kits available:


Gumball Quilt Pattern with Halloween Fabrics


The pattern is called "Gumballs" and is included with the kit.  The finished quilt measures 55" x 65" and the kit is available for $52.50 which includes everything you need except the backing and the batting.  


Halloween Quilt Kit

Stop by the shop or give us a call if you'd like to order over the phone!  
(801) 225-3123


Saturday, September 1, 2012

Trick or Treat Bag Tutorial


Trick or Treat Bag Tutorial from The Fabric Mill Blog


Trick or Treat Bag Tutorial
by Trisha Weekes


Materials needed:
½ yard of outside fabric
½ yard of liner fabric
1 fat quarter of choice
*optional-2 yards of jumbo ric-rac
Thread

note:  please read through all steps before beginning any project

Step one:
Start by squaring up your fabric, making sure you have 2- 18”x42” rectangles (18”x21” folded) removing the selvedge edges.

From the fat quarter cut 2- 4”x22” strips, these are for our handles.

Trick or Treat Bag Tutorial

Step two:

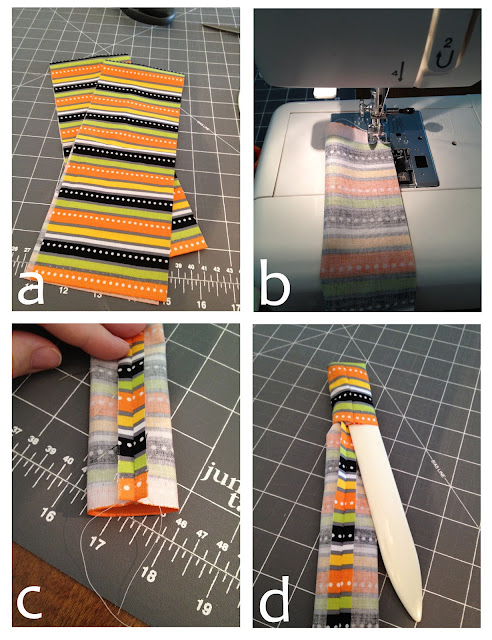
(a)  Fold the 4”x22” strips in half lengthwise, right sides together. 
(b)  Sew a ¼” seam lengthwise down both strips of fabric. 
(c)  Open and Press seams.
(d)  Turn each strip so right sides are out. 

Trick or Treat Bag Tutorial

Press so the seam is running down the middle, turn over and top stitch ¼” on each side of the handle. Repeat until both handles are complete.


Trick or Treat Bag Tutorial


Step three:

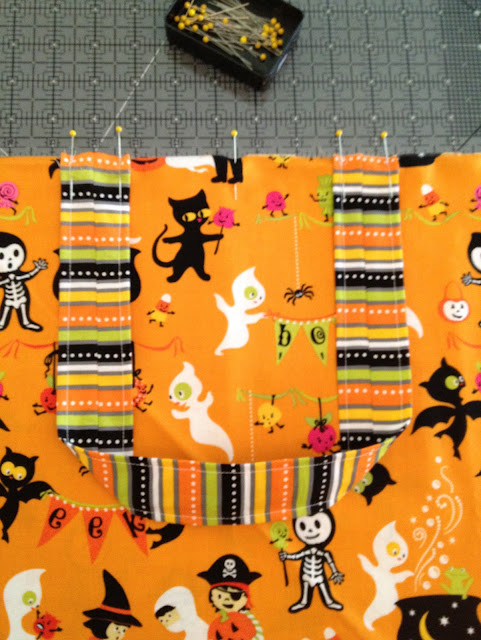
Pin handles onto the top outside of selected fabric, at 8” in and 14”in from the side. You want the seam on the handle to be facing the liner fabric. Fold fabric over and using the first handles as a guide pin the other handle to the other side. Then place the lining fabric to the outside of fabric (right sides together) and sandwich the handles between the two fabrics. 


Trick or Treat Bag Tutorial


Pin, then sew a ¼” seam along the top of both fabrics, back stitching over the handles to secure them between the two fabrics.


Trick or Treat Bag Tutorial


Step four:

Open and press this seam, then fold the fabrics in half lengthwise (right sides together still). Liner fabric facing liner fabric and outside facing outside. Sew a ¼” seam down the side.  Open and press this seam. 


Trick or Treat Bag Tutorial


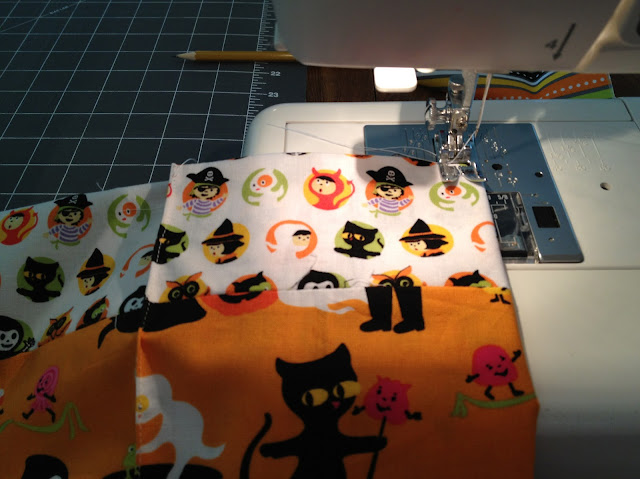
Fold back over the outside fabric (so the right sides out), line up the raw edge of the outside with the bottom of raw edge of the liner fabric (wrong sides together). At this step you have the option to add a heavy interfacing to the bag, we've left it out of our bag. Sew a ¼” seam around the bottom opening, just the two layers not the four total layers.  Then zig-zag stitch the raw layers to prevent fraying.


Trick or Treat Bag Tutorial


Step five:


Now we're going to create the border at the top of the bag, by shifting the two fabrics about 2”. By doing this it creates a unique layer, we get to see the liner fabric at the same time as the outside, but also creates the bottom of the bags guides and seams. 

*Please note: that with my fabric, the liner fabric as seen from the outside of the bag is going the right direction, but when looking down into the bag it is upside down. If you have chosen a directional print you will need to sew your liner fabric upside down in the previous steps as well*


Step six:

Open up the bottom opening and fold it on the seams, fold in the ends like you would a present, forming a triangle on both ends. 


Trick or Treat Bag Tutorial

With a ruler and pencil we're going to mark the sides- line up the ruler with the triangle to the top of the bag and make a light line. Do all four sides; after the first two, flip it over refold triangles and draw lines.


Trick or Treat Bag Tutorial


Fold and sew an 1/8” seam down each of the lines drawn.


Trick or Treat Bag Tutorial

Step seven:

Fold the bag in half horizontally, lining up side seams and handles. Turn the bag inside out so the liner is facing out.  We're going to sew up the bottom- line up the fabric (should be the outside fabric folded over, no raw edges). 


Trick or Treat Bag Tutorial


Sew a ¼” seam, then zig-zag stitch to reinforce the bottom.


Trick or Treat Bag Tutorial


Step eight:

Open up the bottom seams again, with the triangles poking to the outside of the bag. Along that seam you're going to sew, this will create the bottom sides of the bag. Repeat on the other side. 


Trick or Treat Bag Tutorial


Next we'll fold in the triangle and following the seam we'll stay stitch the triangle in place on the bottom of the bag. Repeat on the other side.


Trick or Treat Bag Tutorial

Trick or Treat Bag Tutorial


Step nine:

Back up to the top of the bag, we're going to top stitch (¼”) around the top and top stitch the handles down to the bag. 

Trick or Treat Bag Tutorial

Next stabilize the handles by making X's as shown in the picture. 


Trick or Treat Bag Tutorial


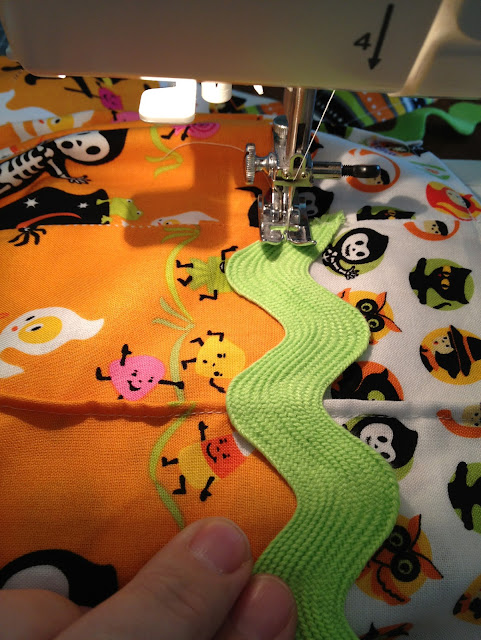
The ric-rac is optional, if you want you can leave it off. To add the ric-rac, line it up with the outside/ liner seam starting at a side, stitch through the middle of the ric-rac securing it to the bag all around the bag.


Trick or Treat Bag Tutorial


Step ten:

Give this bag to a kid, who is willing to go door to door and ask for a trick or a treat! Enjoy a bag full of treats!


Trick or Treat Bag Tutorial


Monday, August 27, 2012

Spiderweb Table Topper Tutorial


Time for another tutorial to help you get your house ready for Halloween!  This is a delightful Spiderweb Table Topper that is easier to create than you may think.  


This project's finished measurements are 30" from one edge to the parallel edge, and 34" from one point to the opposite point.

Supplies Needed:

1/6 yard each of 6 different fabrics
1 yard backing
1/4 yard binding
Also needed:  a long ruler that has a 60-degree marking on it

Steps:

1.  From each of the 6 fabrics, cut two strips that are 3" x width of fabric. Sort the 12 strips into two groups of 6 so that there is one of each fabric in each grouping.

2.  Next, sew each set of 6 strips together using a 1/4" seam.  The recommended method is to sew two strips together, then press the seam open.  Sew the next two together and press that seam open.  Then sew the last two strips and press open.  Now sew the three sets together, again pressing the seams open.  This method helps prevent warping of the final strip set.  

Each set of strips should measure 15.5" x width of fabric (42" - 44")


Halloween Fabric

3.  Find the 60 degree marking on your ruler:  (I highlighted the 60-degree lines on my ruler so you could see them a bit better.)

60 degree ruler

4.  Line up one of the 60-degree lines with the bottom edge of your fabric strips.  Make sure the top right edge of your ruler crosses just inside of the edge of the top strip (see photo below)  Carefully cut fabric.


60 degree ruler

5.  Keeping fabric strips in place, flip ruler over and find the 60-degree line going in the other direction.  Line up that line again with the bottom edge of the fabric strips. The bottom right side of the ruler should be 1/4" to the left of the point where you started your last cut (see red circle in photo below.)   

Carefully cut fabric.  To check your 60-degree triangles, use the measurements in the photo below (18" at the widest edge and 15.5" tall through the triangle center.  It's okay if this is a little off.)

Spiderweb Table Topper Tutorial

For the next triangle flip your ruler again and move it over (keeping the bottom edge of the strips lined up with that 60-degree mark) so that the top right edge of the ruler is about 1/4" to the left of where your last cut ended.  Triangle #2 is a mirror image so to speak of triangles 1 and 3.  See the diagram below:


6.  From each set of strips you will get three triangles.  Cut all 6 triangles and arrange as desired:

Spiderweb Table Topper

7.  You will be sewing these triangles together into two sets of three.  (Three triangles to form the top half and three triangles to form the bottom half.)  As you sew triangles together, match up the seams and pin at each match-up point (see photo below.)  Press seams open.

Spiderweb Table Topper Tutorial


8.  Once you have the top and bottom halves sewn and pressed, place the two halves right-sides-together (matching up seams as you did above) and sew using a 1/4" seam.  Press.


Your spiderweb top is complete!  Layer with the backing and the batting and then quilt however you would like.  I chose to do some straight-line quilting that echoes the seam lines of each strip.  


Spiderweb Table Topper quilting

The binding is done the same way you would bind a quilt.  Don't let the points intimidate you :)  I thought it would be a little tricky, but I used bias binding and it finished up nicely!

table topper binding


If you make a spiderweb table topper we'd love to see it!  Leave a comment on this post with a link to the photo (on your blog, flickr account, etc).