Wednesday, January 30, 2013

Jack’s Blocks Quilt Kit


One of our newest kits is this cute crib-size quilt is made using fabrics from the new Northcott line “Robotex” and a pattern called “Jack’s Blocks.” 

Jack's Blocks quilt kit

These fabrics are all boy- robots, gears and tools!

Robotex fabric Northcott Mint Blossom

The Jack’s Blocks quilt kit is available for $40.95.  Finished quilt measures 42” x 55”


Jack's Blocks crib size quilt

The kit includes everything except backing and batting.  The Jack’s Blocks pattern is included in the kit but is also available separately.  (The pattern also includes instructions for throw, twin and queen size quilts.)

**Kits are available in the shop or also by ordering over the phone (801) 225-3123**

Thursday, January 24, 2013

Fourth Friday Follower Giveaway!

**Giveaway is now closed.  Be sure to check back on the the next 4th Friday for our next giveaway!**

Welcome to the 4th Friday of the month and a new thing we’ll be starting.  It’s called the “Fourth Friday Follower Giveaway”. 


Every 4th Friday we’ll be having a giveaway here on our blog.  Each month it will be something different – this month we are giving away a $25 gift certificate to The Fabric Mill! 

To enter:  If you’re not already a follower, become one and then leave a comment on this post.  We’d love to hear what fabric line you’re looking forward to working with next!  That’s it!  Do those two things and you’ll be entered to win the $25 gift certificate.  Giveaway closes Thursday, January 31 at midnight.  Winner will be chosen at random and announced here on this blog Friday, February 1st!

(note:  If you are a no-reply blogger be sure to leave your email address in your comment so we can contact you when you win!)


Bugged Out!


Do you know a child that LOVES bugs?  We have the perfect fabrics and quilt kit for you!  

"Bugged Out"
Bugged Out quilt kit


This cute quilt uses 14 different bug fabrics which means there are plenty of bugs and little critters for your kiddo to "spy."  

bug quilt

The finished quilt measures 44" x 50"
This kit includes the quick and easy pattern and is priced at $37.00

quilt using bug fabrics

These kits are available in the shop or also by ordering over the phone (801) 225-3123


Wednesday, January 23, 2013

Noteworthy

Noteworthy fat quarters

Noteworthy (Moda) arrived in the shop last week.  This is yet another fantastic line by the Sweetwater folks.    I find these bright, cheerful colors just what I need right now.  These gray January days are starting to drag me down!  

These stacks of fat quarters show just some of the prints available in the Noteworthy line.  We have the entire line at the shop.  Stop by and let these lovely colors warm you up!

Noteworthy fat quarters

Coming up on Friday:
It's time for another giveaway - and you're not going to want to miss this one!


Tuesday, January 15, 2013

Black / White

Anyone else remember those jokes from grade school that went something like: "What's black and white and red all over?"  It seems like there were several punch lines to that joke yet I cannot remember any of them.  Do you?  One of them had to do with a zebra, or a newspaper??  Grade school was a LONG time ago!

We have many black and white fabrics in the shop right now and any combination of them would make a stunning quilt.  

Here are just three of the lines:

Mama Said Sew (Moda)


Mystique (Riley Blake)


Little Black Dress (Moda)


Monday, January 14, 2013

Toy Bag & Play Mat Tutorial


As a mom I’m always looking for ways to keep my home clean and organized and kids toys have always stumped me. I’d organize their toys and then get frustrated when they didn’t put things back where I assigned. Guess I’m a little too organized, but the thought of a “toy box”, a free for all dumping ground for toys makes me break out in a rash. Anybody else? This is my solution- A toy bag that converts to a play mat and then back to a storage bag. Since making this one for brick building blocks (aka Legos), I thought this could work for so many other toys; especially ones with small pieces. You could even make small individual play mats, 18x18” would be a perfect fun size. Constructing it would be the same just smaller measurements. I’ll have to play with that and then let you know, on with the tutorial-
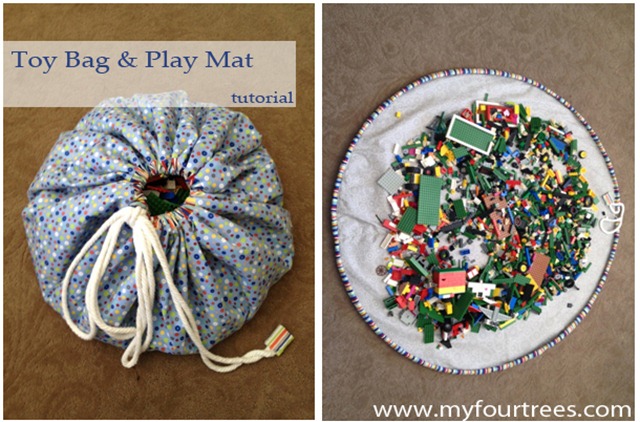

Toy Bag and Play Mat tutorial - great for Legos!

Toy Bag & Play Mat Tutorial
by
Trisha Weekes

Supplies Needed:
42-44” of 2 Fabrics (depends on your WOF (width of fabric) without selvedges) Measure that, and then get that amount in inches, LOF (length of fabric).
1/3 yard of fabric for drawstring casing
4 yards of 3/8” Cording
4 2/3 yards of Fusible interfacing for light weight fabrics (or less if you only want it on the liner fabric)
 
Step 1-
Square up the fabrics and remove the selvedge from all fabrics.

drawstring toy bag tutorial

Next, we’ll iron on the fusible interfacing to the fabrics designated for the bag body.

*Note- I decided to apply the fusible interfacing because the bricks have sharp corners and I thought it wouldn’t take long to wear a hole in the fabrics. You can apply it to only the liner fabric or go without entirely, it’s up to you. Also the interfacing isn’t as wide as the fabrics even doubled, so it’s still a good inch or two shorter. I’d make sure my interfacing matched in the middle instead of on the sides of the fabrics. (As shown in the photo)
 
drawstring toy bag tutorial
 
Step 2-
Now we’re going to cut out our circles for the bags. The way I decided to do this step was, fold the fabric into fourths, pin a string to the folded corner and take a string to the edge parallel to it. I marked the string; you can cut if that works for you, I didn’t want to cut this string because it was for another project. Then I took my fabric pencil and held it to that mark on the string and then guided it from corner to corner, allowing the pencil to drag on the fabric. I did have to hold the corner with the pinned string, pull the string tautly with the other, and then proceed to make the mark. This worked for me; any other suggestions for this step are welcome. Then cut on the line made by the pencil.
 
 
drawstring toy bag tutorial

drawstring toy bag tutorial

My circles ended up being 42” round. I cut out the first one and then just laid it on top of the other folded square to make sure they were the right size.

 
drawstring toy bag tutorial

Step 3-
To make the casing for the drawstring, cut up the third of a yard of fabric into 3” strips, you should get 4 strips out of the third yard of fabric. Remove the selvedges, if you haven’t already.

drawstring toy bag tutorial

Then sew the strips end to end. Once that’s done, quickly measure the full circle by laying the strips on the circumference of circle and then cutting the strip to fit the circle.
 
drawstring toy bag tutorial

Turn a ¼” hem on each of the short ends.
 
drawstring toy bag tutorial

Then fold in half lengthwise and sew a 1/4” seam the length of the casing.

drawstring toy bag tutorial

Step 4-
Pin casing to liner fabric, sew using a ¼” seam. (You will have a 1” gap on the casing, but this is fine and needed for the drawstring to work properly.)

drawstring toy bag tutorial
 
Then lay the two circles on top of each other, line them up and pin- right sides together.

drawstring toy bag tutorial
 
Sew a ¼” seam all around both circles, leaving a 10-12” opening for turning, opposite the opening for the drawstring.
drawstring toy bag tutorial

Step 5-
Sew closed the opening used for turning the fabrics.

drawstring toy bag tutorial

Pin, then topstitch close to the edge, all around finishing the body of the bag.
 
drawstring toy bag tutorial

Step 6- (is optional but highly recommended)

Sew on the folded lines of both circles, from edge to edge, making the 2 pieces a united whole. That way when you wash the bag shifting will not be an issue.

drawstring toy bag tutorial

drawstring toy bag tutorial

Step 7-
Thread the drawstring through the casing, starting at one end and going full circle until you come out the other opening. To do this I attach a large safety pin to the string and guide it through the casing gathering it up as I go.
 
 
drawstring toy bag tutorial


Step 8-
Make a knot in the drawstring and be finished! Or…
 
I made a little tag, inserted the ends and sewed the tag closed. I went back and forth a few times to ensure the string would not come out. It’s your choice. I like finishing details that make handmade items look like retail items. The tag sews like this: take a 3x3.5” piece from the strips used for the casing. Make a ¼” hem on the longer end, then fold in half and sew a seam down the side and bottom. Trim thread and corners, then turn right side out. Insert ends of string into tag and sew the tag closed.

drawstring toy bag tutorial

drawstring toy bag tutorial

drawstring toy bag tutorial

I hope this tutorial will help you with some of your toy frustrations; it’s certainly made a difference with mine! I love how the drawstring acts as a barrier to runaway toys while in play.
 
drawstring Lego play mat tutorial!

drawstring Lego play mat tutorial!

drawstring Lego play mat tutorial!

It’s so easy to clean-up, here is my four year old closing up the bag!

Toy bag and play mat tutorial


Saturday, December 29, 2012

iPad Cover Tutorial

Did you or a family member become an iPad owner this Christmas?  Then you'll need one of these!  I've had one of these quilted iPad covers for awhile and I love it.

This particular cover is what I would consider a comfortable size.  This is not a tight-fitting cover.  I wanted it to be easy for my kiddos to use this.  I can grab it on the way out the door and quickly slide the ipad in without a struggle.  The elastic closure and button ensure that the iPad is snug inside and well protected.  If you would like this to be a tight fit, increase your seam allowance to 1/2".

iPad cover tutorial

iPad Cover Tutorial
by
Andy Knowlton


Materials Needed:
2 Coordinating Fat Quarters
button
6" or so of thin elastic
thin batting

Cutting Instructions:
  • From one of the fat quarters (this is for the cover lining/inside) cut 2 pieces that are 9.5" x 11.5" and then two pieces that are 4" x 10" (this is for the pieced outer cover)
  • From the second fat quarter cut two pieces that are 9" x 10" (This is also for the pieced outer cover).
  • Batting: Cut two pieces that are 9.5" x 11.5" and two that are at least 10" x 12"


iPad cover using fat quarters


Step 1:
We will first make the outer cover.  Sew each of the 4" x 10" pieces to the 9" x 10" pieces.  Press. 

Step 2:
Place the outer cover pieces over the batting pieces that are 10" x 12."  Baste using a few basting pins or using a bit of basting spray.  

iPad cover using fat quarters

Quilt as desired, then trim both pieces to be 9.5" x 11.5"

iPad cover using fat quarters

Step 3:
Place the two outer cover pieces together (right sides together) and pin.  Be sure to line up those seam lines (see photo below).  When you get the cover finished it will be obvious if these seam lines are not matched up.  Sew the two outer cover pieces together (using a 1/4" seam) along the sides and bottom, pivoting at the two bottom corners.  Leave the top open.  Clip the corners to reduce bulk.

Turn outer cover right-side-out.  Gently push out the corners (I use the tips of a blunt-edge pair of scissors.  A car key would work as well.)

iPad cover using fat quarters


Step 4:
Sew on your button in the center of one side and about 2" down from the top edge.

iPad cover using fat quarters

Step 5:
Now we are going to work on the lining.  Layer a piece of batting, then one of the lining pieces (right side up), then another lining piece (right side down), and then the final batting piece.  The two lining pieces should be right-sides-together with the batting pieces on the outsides.  Pin together around all edges.

iPad cover using fat quarters

This next step is optional - but I find it helpful!  At the bottom edge of the batting, cut a notch out that is about 5" long and about 1/4" high.  Trim JUST the batting - not the lining fabric.  Repeat for both pieces of batting.  (Cutting this notch will help reduce bulkiness when you are stitching the opening closed.)

iPad cover using fat quarters

Sew 1/4" seam along the sides and bottom of the lining/batting sandwich, stopping at the notched section of batting (or at about 2" in from each side.)  Leave the notched section unsewn - this is where you will turn the cover right-side-out.  Leave the top open as well.  Clip the corners to reduce bulk.

Step 6:
Place the outer cover (right side out) inside the lining so that the two (inner and outer cover) are right sides together.  

Match side seams and pin in place all along top edge.  

Measure the amount of elastic you will need (this depends on the placement and size of your button).  Place the piece of elastic loop-side-in, between the lining and outer cover on the opposite side of where the button is.  Pin elastic in place.

iPad cover using fat quarters

Step 7:
Sew (using 1/4" seam) around the top edge of the cover, catching the ends of the elastic.  After you have sewn around the whole top edge, trim the ends of your elastic.  Mine were obviously WAY too long. 


iPad cover tutorial

iPad cover tutorial


Step 8:
Through the opening in the bottom of the lining (remember that notched section of batting?) turn the cover right-side-out.  Find the bottom edge of the lining that is unsewn.  Fold the raw edges in about 1/4" and stitch the opening closed.  This is where the notched batting helps reduce bulk and make this stitching easier.  


iPad cover tutorial

Step 9:
Push the liner inside of the outer case.  Reach in and push the corners in and smooth the liner so that it lays flat inside of the cover.  I like to press the edge of the top opening to help it to lay flat as well.  

iPad cover tutorial


iPad cover tutorial

And there you have it-- a personalized iPad case to take with you everywhere you go!  I love mine so much, but the guys in my family had a problem with the flowers.  So I made a more masculine version to appease them.  

iPad cover tutorial